I’ve been stepping on bath mats every single day for the better part of a decade, and honestly, they’re one of those things we don’t think about until something goes wrong. There’s nothing quite like reaching for your fluffy bath mat after a hot shower, only to catch a whiff of mustiness or notice it’s not as soft as it used to be. I’ve learned the hard way—through trial and error, some frustrating mistakes, and plenty of successful experiments—what actually works when it comes to keeping these essential bathroom staples clean and fresh.
This guide isn’t just theory. It’s drawn from real experience with cotton mats, memory foam mats, bamboo mats, and everything in between. I want to share what I’ve discovered so you can skip the learning curve and keep your bath mats looking and smelling amazing.
Understanding Your Bath Mat: Foundation for Success
Before you can properly clean a bath mat, you need to know what you’re working with. This might sound obvious, but the difference between a cotton mat and a memory foam mat is like the difference between washing a cotton t-shirt and washing a delicate sweater. Get it wrong, and you’ll end up disappointed.
I learned this lesson after throwing a premium microfiber mat into hot water with heavy detergent, expecting it to come out even softer. Instead, it came out stiff and uncomfortable. That’s when I realized I’d been treating every mat the same way, which was the problem.
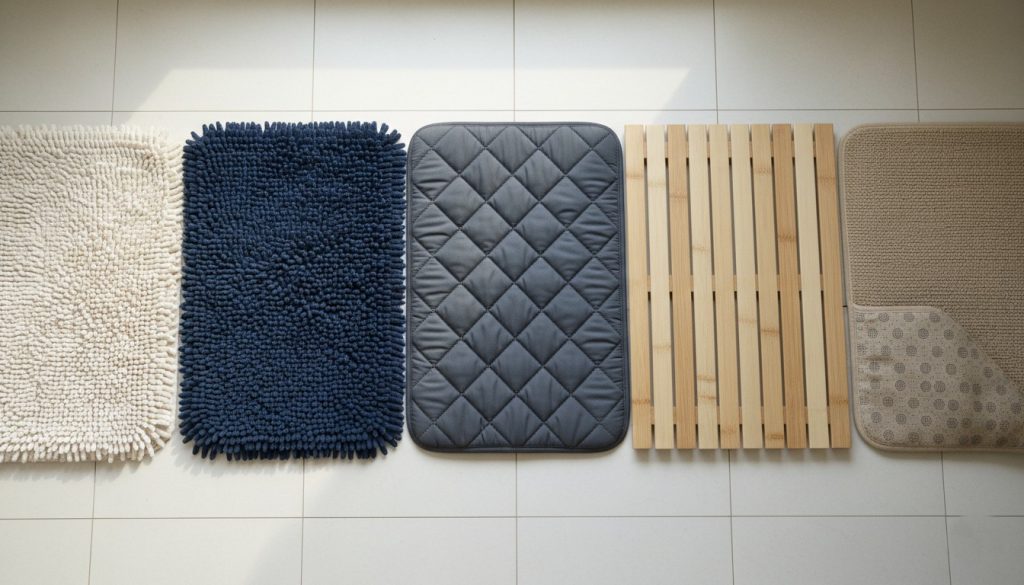
Your mat’s material determines everything: water temperature, detergent type, drying method, and how often you should clean it. Some materials love hot water, while others get damaged by it. Some can handle aggressive scrubbing, while others need a gentle touch. Knowing your mat’s composition isn’t just helpful—it’s essential if you want it to last years instead of months.
When you’re buying a new mat, check the care tag carefully. I usually take a photo of it on my phone for reference. Some people ignore these tags thinking they’re overly cautious, but in my experience, manufacturers know their products. That label is worth its weight in gold.
How to Clean Bath Mats: The Fundamentals
A. Pre-Cleaning Preparation
Getting your bath mat clean starts before you even get it wet. I used to just toss mine straight into the washing machine, but I’ve found that a few quick prep steps make a huge difference in how clean it actually gets and how long it lasts.
First, shake your mat out thoroughly outside. I mean really shake it. All that dust, skin cells, and lint that’s accumulated deep in the fibers needs to go. A quick shake over the trash can or outside removes a surprising amount of debris. This matters because when you wash the mat, you want the water and detergent working on actual dirt, not just pushing dead skin cells around.
Next, assess what you’re dealing with. Is the mat just generally dingy, or are there specific stains or problem areas? A mat that’s just dirty is different from one that smells musty or has visible mold starting. I take a quick mental inventory before washing because it helps me decide whether I need to pre-treat anything or use a specialized cleaning method.
Finally, consider the water temperature and detergent you’ll use based on your mat’s material. I keep my favorite mild detergent front and center in my bathroom cabinet specifically because it works well on most mat materials without being too harsh. For heavily soiled mats, I might mix a small amount of white vinegar or add a gentle oxygen-based cleaner, depending on what I’m dealing with.
B. Basic Cleaning Methods
I’ve settled into a routine that works for most of my mats. For standard cotton and cotton-blend mats—which is probably what most people have—machine washing is totally fine and actually preferable. I use warm water (not hot), a gentle cycle, and mild detergent. This combination gets everything clean without stressing the fibers.
The key is not to overload the washing machine. I used to try to wash my mat along with towels and other items, and everything would come out less clean. Now I either wash it solo or with one or two other lightweight items. The mat needs space to move around in the water so the detergent can actually reach all the fibers.
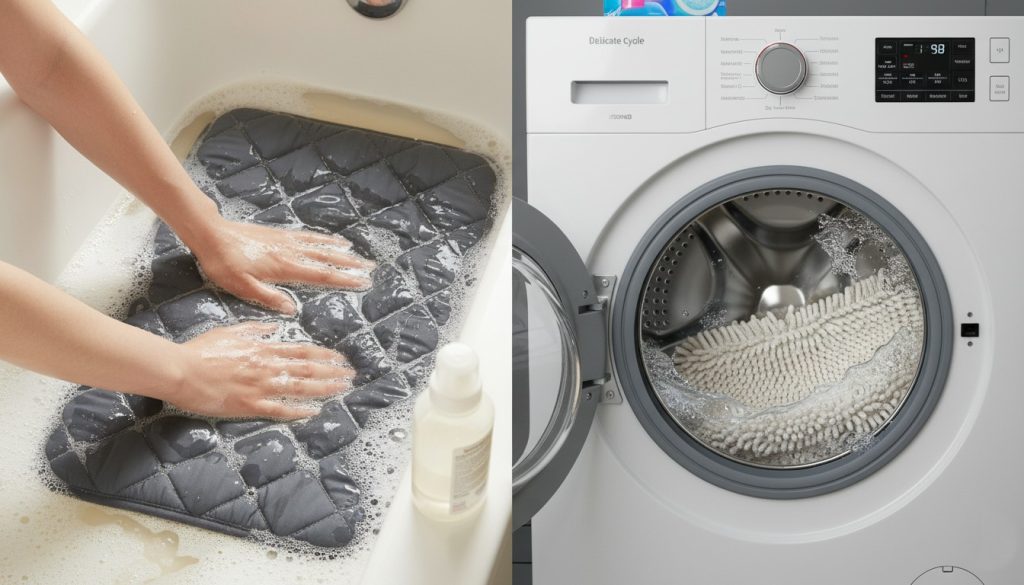
For delicate mats or ones with special backing, hand washing is your friend. I do this with memory foam mats specifically. I fill my bathtub with lukewarm water, add a small amount of mild detergent, and gently soak and swish the mat around for a few minutes. No aggressive scrubbing, no wringing—just gentle submersion and a light squeeze to release the dirty water. I rinse several times with clean water until the water runs clear.
Drying is where most people go wrong, and it’s honestly crucial. I learned this the hard way when a mat that I’d machine washed and then tossed in the dryer came out with a funky smell because it didn’t dry properly inside. Now I always air dry my mats, usually by hanging them over a bathroom towel rack or laying them flat on a clean surface. In good weather, I’ll throw them on the line outside—the combination of air circulation and sunshine naturally sanitizes them. A completely dry mat is a mat that won’t develop mold or odors.
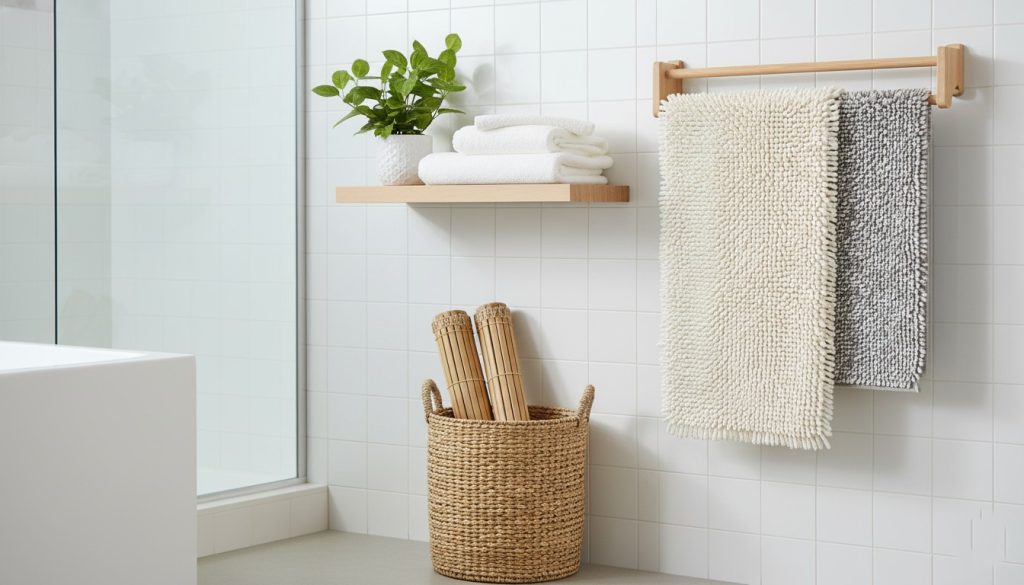
Cleaning Methods for Different Materials
A. Cotton and Microfiber Bath Mats
Cotton is probably the most forgiving mat material to clean. I’ve had several cotton mats over the years, and they’re pretty hard to ruin if you follow basic care. They handle warm water well, tolerate standard detergent, and can actually benefit from being washed regularly—usually once a week if you’re using them daily like I do.
Microfiber is trickier than regular cotton, and I’ve learned this from experience. These mats feel amazing and dry quickly, which I love, but they’re surprisingly delicate. Hot water can actually damage the fibers and make them feel rough instead of soft. I stick to lukewarm water and a very mild detergent. I also avoid fabric softener completely—it actually ruins the microfiber’s ability to absorb water properly, which defeats the whole purpose.
For both of these materials, I skip the dryer. Machine washing is fine, but the heat from the dryer can damage the fibers and reduce their lifespan significantly. Air drying takes longer, sure, but the mat lasts so much longer that it’s worth it.
B. Memory Foam Bath Mats
Memory foam mats are special. They’re incredibly comfortable and provide amazing support, but they need a gentler hand than most people realize. I made the mistake early on of treating mine like a regular cotton mat, and the result was disappointing—it came out less supportive and started falling apart at the edges.
Now I approach memory foam mats with caution. Machine washing is actually not recommended for these. Instead, I spot clean stains when they happen and give the mat a full hand wash maybe once a month. I fill my bathtub with lukewarm water and a small amount of mild detergent, submerge the mat, and let it soak for a few minutes. Then I gently work the soapy water through the mat by squeezing it gently—no scrubbing, no twisting. After rinsing thoroughly with clean water several times, I squeeze out as much water as I can without wringing it out.
Drying is critical with these mats. I lay mine flat on a clean, dry towel in a well-ventilated area, and I make sure it’s completely dry before putting it back in the bathroom. Moisture left inside memory foam can lead to mold growth, which would be a disaster.
C. Bamboo and Natural Fiber Mats
Bamboo mats are beautiful and eco-friendly, but they require respect. I’ve had two bamboo mats, and I’ve learned that these are not your average bath mat. They’re more like art pieces that happen to be functional.
Bamboo doesn’t like excessive moisture or high heat. I never machine wash mine—it’s always hand wash with lukewarm water and very mild soap. I also keep the washing time short. These mats don’t actually need to soak; a quick gentle wash is sufficient. The fibers can weaken if they’re saturated with water for too long.
Drying is where patience becomes essential. I dry my bamboo mat standing up or partially upright so air can circulate through it. Laying it flat can trap moisture between the fibers. I also make sure it’s completely dry before returning it to the bathroom, as moisture in the fibers can lead to mold.
D. Specialty Materials
Rubber-backed mats are common, and the rubber backing is actually the tricky part to clean. The mat itself might be cotton or microfiber, but that rubber backing can deteriorate if you’re not careful. I avoid high heat and very hot water when I have rubber-backed mats because the heat can break down the rubber glue that holds it together.
Designer mats and high-end materials often come with specific care instructions, and I’ve learned to follow these religiously. I once bought a premium Turkish cotton mat that required specific water temperatures and detergent types. It felt like overkill at first, but the mat lasted so much longer than cheaper options that I understood why the manufacturer was so specific.
How to Clean Specific Types of Bath Mats
A. Traditional Woven Bath Mats
Your standard, everyday woven bath mat is probably what most of us are using. These are durable workhorses that can handle regular machine washing. I wash mine weekly, using warm water and a gentle cycle. The key is not to use scorching hot water—that can actually fade the color and weaken the fibers over time.
One thing I’ve noticed is that the texture matters. If your woven mat has any kind of special weave or pattern, aggressive washing can actually affect how that pattern looks. I use a gentler cycle than I would for regular towels, and I’ve found that my mats maintain their appearance much better this way.
Drying determines whether your mat stays vibrant and soft. I always air dry, either draped over a towel rack or laid flat. When the mat is completely dry, it smells fresh and looks almost like new.
B. Bath Rugs with Non-Slip Backing
Non-slip backed mats are brilliant for safety, but they do require special consideration. That rubbery, grippy backing can separate from the mat if you’re too rough with it during washing. I machine wash mine, but I always use a gentle cycle and lukewarm water. I also avoid using hot water because the heat can weaken the adhesive holding the backing to the mat.
Here’s something I learned the hard way: don’t put a backed mat in the dryer, even on low heat. The heat accelerates the degradation of that non-slip backing. I air dry mine every single time.
The lifespan of these mats is generally quite good if you care for them properly. I had one that lasted nearly five years of daily use before the backing finally started to wear. That’s impressive for such a heavily used item.
C. Bathroom Floor Mats and Runner Rugs
Larger bathroom floor mats and runner rugs are a different beast because of their size and weight. I have a long runner mat outside my shower, and washing it required me to learn some tricks.
Machine washing is usually fine, but I use a large-capacity machine to give the mat adequate space to move around. If your home machine is too small, consider using a laundromat’s commercial washer—they’re designed to handle larger items. I do this occasionally, and the results are fantastic because commercial machines really agitate more effectively.
For drying, I learned quickly that laying a large mat flat on a regular clothesline isn’t ideal because the weight of the wet mat can cause it to stretch out of shape. Instead, I fold it in half or thirds and drape it over a clothesline so the weight is distributed. Or I lay it flat on a clean, dry surface in a sunny spot and let it dry in place.
D. Shower Mats with Suction Cups
Shower mats with suction cup backing require their own approach. Those suction cups can accumulate dirt and mold quite easily since they’re often sitting in standing water. Before I wash the mat itself, I remove it from the shower and clean those suction cups separately.
I use a soft brush and some soapy water to clean each suction cup, making sure to remove any mold or buildup. Sometimes I need to soak them briefly in a vinegar solution if there’s stubborn mold. Once the cups are clean, I wash the mat itself using the standard method for its material. When reassembling, I make sure the cups are completely dry and the shower floor is clean so they’ll adhere properly.
Tackling Tough Problems: How to Clean Bath Mat Issues
A. Mold and Mildew Removal
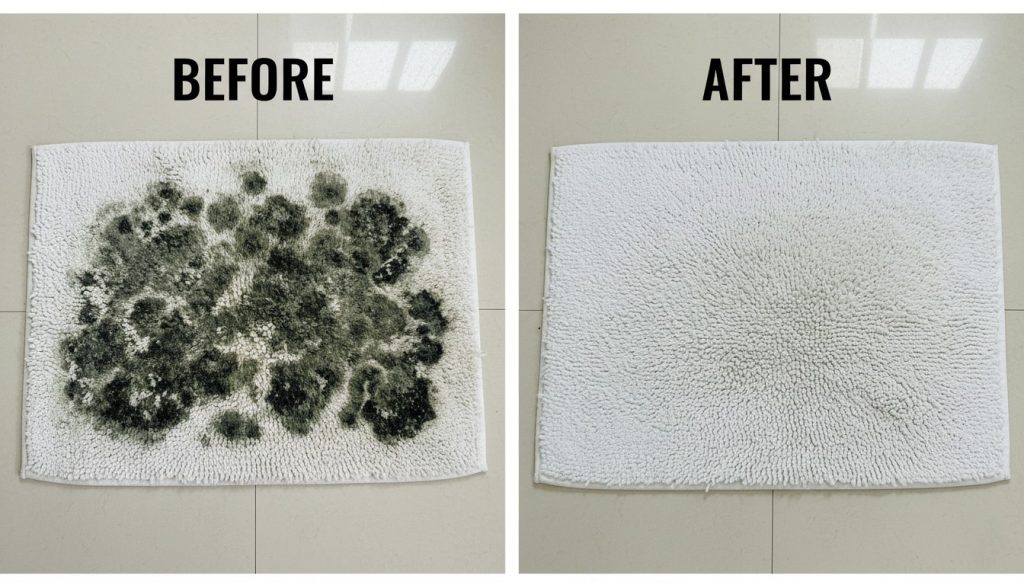
This is the problem I encounter most often, honestly. Bathrooms are naturally humid, and bath mats sit in moisture constantly. If you don’t dry your mat completely, you’re basically creating a perfect environment for mold and mildew to thrive.
I can usually catch mold early by noticing that funky smell before I see visible signs. When I catch it early, I handle it immediately. For surface mold, I mix equal parts white vinegar and water in a spray bottle and spray the affected area. I let it sit for about 15 minutes, then rinse thoroughly with clean water. The acidity in the vinegar kills the mold spores effectively.
For more serious mold that’s penetrated into the fibers, I use a stronger approach. I soak the mat in a solution of water and a small amount of oxygen bleach (the kind that’s color-safe) for a couple of hours, then wash and rinse thoroughly. This works well without damaging most mat materials, though I always check the care tag first.
Prevention is honestly easier than treatment. I air dry my mat completely after each use, ensure my bathroom has good air circulation (I crack the window or run the exhaust fan), and I wash my mats regularly. These three things together have virtually eliminated mold problems for me.
B. Odor Elimination
Musty, unpleasant smells in bath mats are usually caused by incomplete drying or bacterial growth. I’ve learned that this isn’t something you can usually cover up with detergent—you need to actually eliminate the cause.
When I notice my mat starting to smell off, I act quickly. If it’s just a slight mustiness, I’ll wash it with regular detergent and make absolutely sure it dries completely. Sometimes I’ll add a cup of white vinegar to the rinse cycle—this helps eliminate odors naturally without adding artificial scents.
If the smell is stronger or more persistent, I know the issue is likely bacterial, not just moisture. In that case, I use a slightly stronger treatment. I’ll wash the mat with a mild disinfectant or use oxygen-based cleaner in addition to regular detergent. The key is making sure the mat dries completely afterward.
Here’s what I’ve learned: if a mat has developed a persistent, strong odor that won’t wash out after multiple attempts, it might actually be time to replace it. Some smells indicate that bacterial growth has gone pretty deep into the fibers, and while you might get it temporarily clean, the problem could keep coming back.
C. Stubborn Stains and Discoloration
Stains on bath mats come in different varieties, and each one requires a slightly different approach. Soap residue, for instance, is super common, and it actually looks like discoloration. I didn’t realize for years that what I thought was just my mat getting dingy was actually soap buildup from regular washing.
To tackle soap residue, I use a vinegar rinse. After washing my mat with detergent, I run an extra rinse cycle with a cup of white vinegar added. This helps dissolve the soap residue and leaves the mat feeling softer and looking brighter.
Hard water stains are another common issue, especially if you live in an area with mineral-heavy water. These look like white or brownish spots that won’t wash out with regular detergent. I treat these by soaking the stained area in a mixture of equal parts white vinegar and water, then washing normally. Sometimes I need to repeat this, but it usually works.
Rust stains from metal fixtures are trickier. I’ve had these appear on mats that were near a rusted towel bar or shelf. For these, I use a specialized rust remover designed for fabrics—these are usually gentle enough not to damage the mat while being strong enough to break down rust. I follow the product instructions carefully.
D. Bacteria and Moisture-Related Problems
Beyond visible mold, there’s invisible bacterial growth that can happen in damp mats. This usually manifests as an off smell or sometimes as slight discoloration. I handle this by washing my mats more frequently during humid seasons and making sure they dry completely.
For a mat that’s been used heavily or that’s had moisture issues, I do a deeper sanitizing wash occasionally. I use a mild disinfectant or add an oxygen-based cleaner to the wash cycle. This helps eliminate bacteria without damaging the mat the way bleach might.
I’ve learned that frequency of washing matters more than people realize. I wash my daily-use mats about once a week year-round, but in summer when my bathroom is more humid, I sometimes increase this to twice a week. It’s one of those preventative measures that actually works.
Getting Stains Out: Targeted Solutions
A. Common Bathroom Stains
Makeup stains on bath mats are surprisingly common if you use your mat in the morning routine. I’ve definitely had mascara, foundation, or lipstick end up on my mat. These are organic stains, which means you can usually remove them with the right approach.
Personal care products like hair dye can also stain mats. These stains can be stubborn because dyes are designed to be lasting. Mildew stains are organic too, though they’re usually accompanied by the musty smell.
Then there are stains from algae or mineral deposits. I’ve seen these more often in areas with lots of moisture or hard water. They appear as greenish or brownish discoloration that doesn’t necessarily smell bad but looks unsightly.
B. Stain Removal Techniques by Type
For organic stains like mildew or algae, I use enzyme-based cleaners. These products contain natural enzymes that break down organic matter, making them perfect for this kind of problem. I apply the cleaner to the stained area, let it sit for the recommended time, then wash normally.
For mineral stains from hard water, I use vinegar. I soak the stained area in a vinegar-water solution, let it sit for 30 minutes or so, then wash. Sometimes this requires a second application, but it usually works.
Makeup stains respond well to a gentle pre-treatment. I dampen the stain with water, apply a small amount of mild detergent directly to it, and gently rub it with a soft brush or old toothbrush. Then I wash the mat normally. This method has saved several of my mats from permanent makeup staining.
C. Pre-Treatment Methods
The key to successful stain removal is addressing stains quickly—the longer they sit, the harder they are to remove. When I notice a fresh stain, I don’t just throw the mat in with the laundry and hope. I treat it immediately.
For fresh organic stains, I rinse the area with cool water immediately, then apply my chosen treatment. For paste treatments, I mix mild detergent with a small amount of water to create a paste, apply it to the stain, and let it sit for 15-20 minutes before rinsing.
Soaking is another effective method. For more stubborn or older stains, I’ll soak the affected area of the mat in a treatment solution. Depending on the stain type, this might be vinegar and water, enzyme cleaner solution, or a specialized stain remover.
D. Post-Treatment Care
After treating a stain, I always rinse very thoroughly. Leftover treatment solution can actually cause new problems if it’s not completely rinsed out. I rinse the treated area several times with clean water until the rinse water runs clear.
Then comes the drying step, which is crucial. A damp mat is more prone to staining and mildew than a dry one. I make sure treated mats are completely dry before returning them to the bathroom.
If a stain persists after treatment, I usually try a different approach before giving up. Sometimes combining treatments works better than relying on a single method. If multiple treatments don’t work, I accept that the stain might be permanent—this usually only happens with very old, deeply-set stains or with certain types of dyes.
How to Clean Bath Mat Components: The Details
A. Non-Slip Backing Care
That rubber or grip-textured backing on mats isn’t just there for looks—it serves an important safety function. I’ve learned through experience that maintaining this backing is essential if you want your mat to last and stay safe.
When I wash a backed mat, I’m careful about water temperature because excessive heat can break down the adhesive holding the backing to the mat. I use lukewarm water and avoid putting the mat in the dryer. I also avoid wringing or twisting the mat aggressively, as this can cause the backing to separate from the mat fibers.
If I notice the backing starting to separate or peel, I can sometimes fix it with a flexible fabric glue. I apply the glue to the lifted edges, press the backing back down, and let it dry completely before using the mat again. This quick fix often extends the life of a mat by several months.
When backing is beyond repair and the mat isn’t usable safely anymore, it’s time to replace the mat. A mat with failing non-slip backing defeats its safety purpose.
B. Trim and Edging
Decorative borders and trim can make a mat look more finished, but they also need special attention during washing. These edges can be delicate, and aggressive washing can cause fraying or color bleeding.
When I have a mat with decorative trim, I’m gentler with it during the wash cycle. I use a gentle cycle in the machine rather than a regular or heavy cycle. For mats with expensive trim or embellishments, I hand wash to have more control.
I also pay attention during drying. Edges can get twisted or misshapen if they dry unevenly. I make sure my mat is laid flat or draped evenly when drying, so the trim and edges maintain their shape and appearance.
C. Tufted or Plush Pile Restoration
One of my favorite things about bath mats is that luxurious, plush feeling. But that plushness can fade with regular washing and use. The pile flattens, and the mat stops feeling quite so nice.
To restore plush pile, I try a gentler washing approach. I use shorter wash cycles, avoid hot water, and skip the dryer entirely. After washing, while the mat is still slightly damp, I can actually brush it with a soft-bristled brush to help restore the pile. I brush in one direction gently, working to lift the fibers back up.
Sometimes simply allowing the mat to air dry completely and then brushing it makes a surprising difference. The pile springs back somewhat naturally once it’s completely dry and disturbed from its flattened state.
D. Elastic or Binding Elements
Some bath mats have elastic components or bound edges. These elements can shrink or become damaged if not handled carefully. I avoid very hot water with these mats because heat can cause elastic to lose its stretch.
Binding on edges can fray if it’s not cared for properly. If I notice binding starting to fray, I can sometimes apply a small amount of fabric glue to seal the edge and prevent further fraying. For more significant damage to binding, sometimes it’s worth taking the mat to a seamstress to have the binding replaced or reinforced.
Tools and Supplies Checklist
Over the years, I’ve accumulated a collection of supplies that help me care for my bath mats effectively. You don’t need anything fancy, but having the right tools does make the job easier.
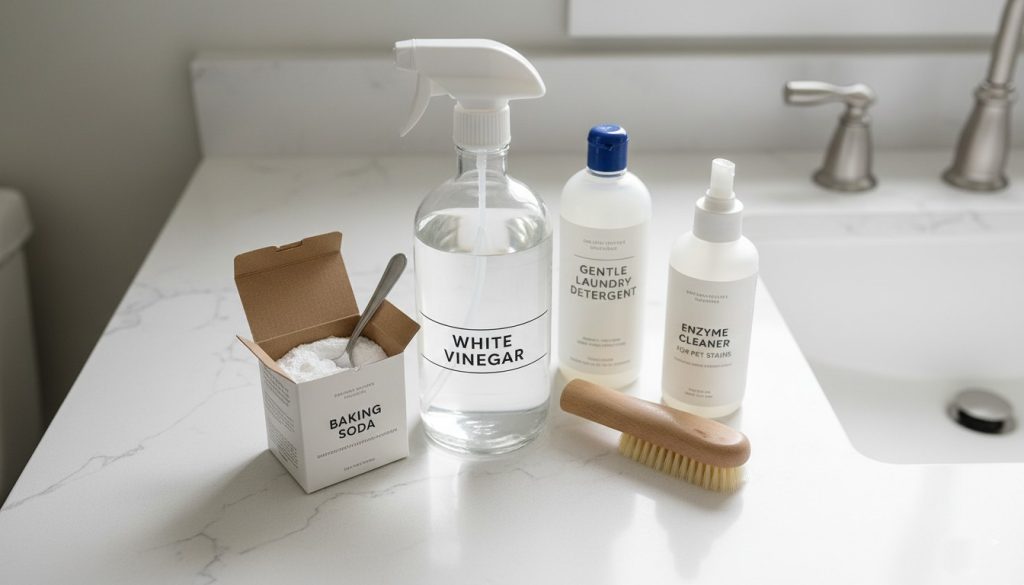
For basic cleaning, I always have mild detergent on hand—something gentle and designed for delicate fabrics works for pretty much every mat type. White vinegar is my secret weapon for everything from odor removal to mineral stain treatment. Baking soda is another multipurpose tool that’s useful for deodorizing mats before washing or for spot treatments.
I keep a soft-bristled brush specifically for pre-treating stains and for restoring plush pile. A spray bottle is useful for applying vinegar solutions or other liquid treatments. Sometimes I’ll use oxygen-based cleaner or enzyme-based stain removers for specific problems, though these aren’t things I use regularly.
Optional specialty products I’ve tried and occasionally use include bleach alternatives for heavily soiled mats (though I use these sparingly and only on white or light mats), fabric softener—though I’ve largely stopped using this because it can actually reduce absorbency—and specialized mold and mildew removal products for serious cases.
For equipment, I use my home washing machine regularly, though I visit a laundromat occasionally for larger items. A clothesline or drying rack is essential for air-drying mats properly. I also keep clean towels on hand for laying out mats to dry on.
Best Practices for Long-Term Bath Mat Care
I’ve developed a routine that keeps my bath mats looking and feeling great despite daily use. The key is consistency and prevention rather than scrambling to fix problems after they develop.
For weekly maintenance, I shake out my daily-use mat several times throughout the week, getting rid of dust and debris. This is honestly one of the simplest and most effective practices I’ve implemented. Once a week, I wash my mat thoroughly using the appropriate method for its material.
Monthly deep cleaning involves a more intensive wash for heavily used mats. If I notice any developing issues—slight odor, minor discoloration—I address them during this monthly wash. I might use a vinegar rinse or add oxygen-based cleaner to really refresh the mat.
Seasonally, my routine adjusts slightly. During humid months, I increase washing frequency and pay extra attention to drying. During dry winter months, I’m less concerned about mold but might need to manage static or potential fiber brittleness. Some mats that are in regular use get this seasonal attention, while my occasional-use mats get brought out and washed before use and properly dried and stored afterward.
Storage for off-season mats matters too. I make sure mats are completely clean and dry before storing them. I store them in a dry place where they won’t pick up moisture or dust. Rolling them rather than folding tightly sometimes prevents creasing.
When to Replace vs. When to Clean
At some point, every bath mat reaches the end of its useful life. I’ve learned to recognize when a mat is truly done versus when it just needs proper cleaning and care.
A mat with permanent, deep-set stains or discoloration that won’t respond to treatment might be beyond saving cosmetically. But even then, if it’s still functional and you don’t mind the appearance, you can keep using it. I have one older mat that’s become my “workout mat” specifically because it’s stained but still perfectly usable.
More serious signs that it’s time to replace a mat include backing that’s deteriorated and can’t be safely repaired, fibers that are falling apart or coming loose, or persistent odor or mold that returns even after thorough treatment. These suggest that the integrity of the mat has been compromised.
The cost-benefit analysis I do is simple: would replacing this mat be more practical than continuing to treat and maintain it? For a mat that cost $15, the answer is probably yes if I’m spending significant time on maintenance. For a mat I paid $50 for, I’m more inclined to keep trying to revive it.
I also consider environmental impact. A mat that’s still functional is better kept in use than replaced, even if it’s not perfect. That said, a falling-apart mat that sheds fibers is probably worse for the environment in other ways, so there’s a balance.
Lifespan expectations vary by material. Budget cotton mats might last a year or two with regular use. Mid-range quality mats often last 3-5 years. Premium or specialty mats can last 5-10 years if cared for properly. My best-lasting mat is a high-quality Turkish cotton that’s now in its sixth year and still going strong because I’ve been careful with it.
Conclusion
I’ve learned a lot through years of daily bath mat use, and honestly, the main takeaway is that these humble items deserve more attention than we usually give them. A few simple practices—choosing the right cleaning method for your mat’s material, drying it completely, and addressing problems early—can keep your mats fresh, soft, and functional for years.
The most important thing I’ve learned is that prevention is far easier than treatment. Complete drying, good bathroom ventilation, regular washing, and quick response to any developing issues prevent most mat problems before they start. It’s so much easier than scrambling to fix a moldy or deeply stained mat later.
If you’re dealing with a mat problem right now, I encourage you to match your mat’s specific material to the appropriate cleaning method I’ve described. If your mat just needs a refresh, consistent care going forward will make a huge difference. And if you’re shopping for a new mat, remember that a slightly more expensive, higher-quality mat that you care for properly will last so much longer than a cheaper one that you neglect.
Your bath mat might seem like a small thing, but it touches your feet every single day, and it sits in one of the dampest, most challenging environments in your home. It deserves the same care you’d give to any important item in your life. Trust me, once you establish a good routine, keeping your bath mats clean and fresh becomes effortless—it just becomes part of how you care for your home.
Leave a Reply