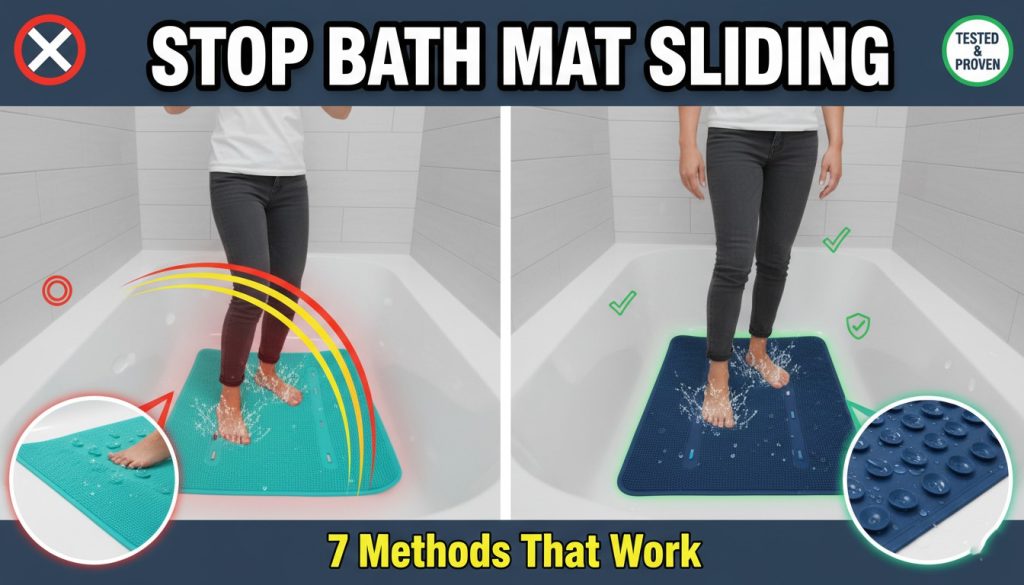
I’ll never forget the morning my bath mat betrayed me. There I was, fresh out of the shower, feeling refreshed and ready to tackle the day—when suddenly, my foot hit the mat and it slid across the tub like I was surfing. My heart jumped into my throat as I grabbed the shower curtain rod (thankfully it held!). That near-miss changed everything about how I think about bathroom safety.
If you’ve ever experienced that stomach-dropping moment when your bath mat decides to go rogue, you’re definitely not alone. After my close call, I became obsessed with figuring out how to make bath mat non-slip and actually stay put. Through plenty of trial and error—and yes, a few more slips along the way—I’ve learned what works and what’s just marketing hype.
In this guide, I’m sharing everything I’ve discovered about keeping bath mats secure, from choosing the right features to tricks that actually work in real bathrooms with real water and real soap scum.
Understanding Why Bath Mats Slip
Here’s what I learned the hard way: it’s not always the mat’s fault. Well, sometimes it is, but there’s usually more going on.
My first apartment had one of those super-smooth fiberglass tubs that looked great but was basically an ice rink when wet. No matter what mat I bought, it would eventually start sliding. I thought I was just buying cheap products until I realized the surface itself was the problem. Smooth tubs and shower floors create almost no friction, especially when water gets underneath the mat.
Then there’s the soap and shampoo situation. I’m a bit of a product junkie—fancy body washes, leave-in conditioners, the works—and all those products leave a film on everything. That residue acts like a lubricant between your mat and the tub surface. Even “clean” bathrooms have this invisible layer building up, and it completely sabotages your mat’s grip.
I also discovered that bath mats don’t last forever (who knew?). My favorite mat with the little octopus pattern started sliding after about eight months. When I flipped it over, the suction cups had gotten hard and lost their flexibility. The material had basically aged out, and no amount of cleaning was bringing it back to life.
Choosing the Right Bath Mat Features
After my slipping incident, I went down a research rabbit hole and tested more bath mats than any reasonable person should own. Here’s what actually matters.
The Role of Suction Cups and Other Grip Technologies
Let’s talk about bath mat adhesion and suction cups, because not all suction cups are created equal. I learned this by buying a mat from a discount store that had these tiny, wimpy suction cups scattered across the bottom. It looked fine, but those little cups couldn’t create enough vacuum pressure to hold anything.
The mats that actually work have larger, more substantial suction cups—usually at least the size of a quarter. My current favorite has these chunky suction cups that are about an inch in diameter, and they create this satisfying “thwump” sound when they lock onto the tub. That sound means business.
I’ve also tried mats with alternative grip systems. One had these intricate silicone patterns instead of traditional suction cups. Honestly? It worked pretty well on my textured shower floor where suction cups failed completely. The silicone created friction through surface contact rather than vacuum pressure. It’s a different approach, but definitely worth considering depending on your bathroom setup.
The number of suction cups matters too. I had one mat with only about 20 cups, and the edges would always peel up. My current mat has over 100 smaller cups distributed evenly, and every part of the mat stays flat. It’s like the difference between a few pieces of tape versus completely covering something—more contact points mean better hold.
Material Selection
I’ve worked my way through rubber, PVC, and silicone mats, and each has its personality. The rubber ones feel more substantial and have a nice weight to them, which actually helps with stability. There’s something reassuring about a mat that feels solid under your feet.
My first “good” bath mat was PVC, and it worked great for about six months before it started getting stiff and cracking around the drainage holes. It did its job, but it definitely had a shorter lifespan than I expected for the price.
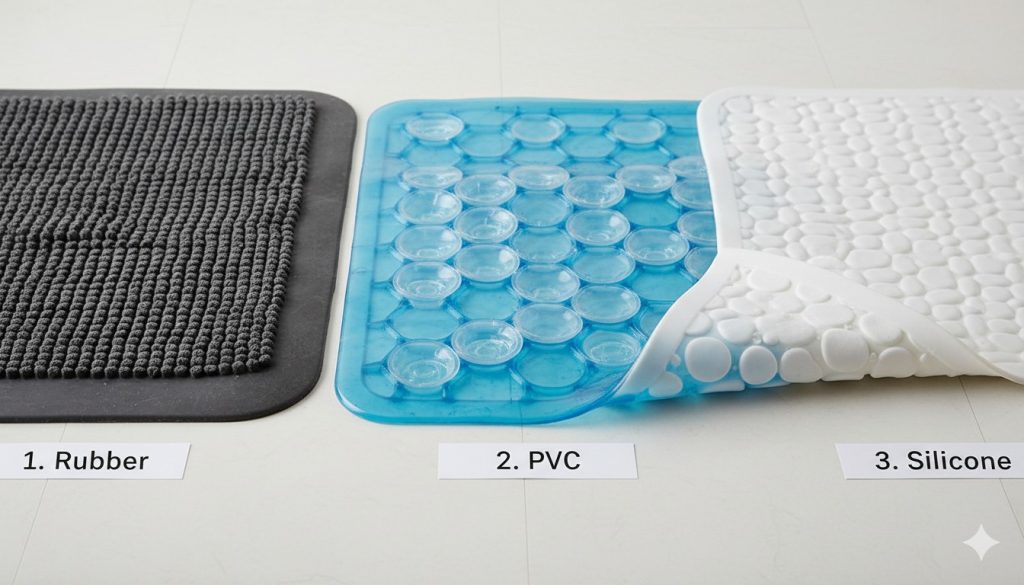
The silicone mat I’m using now has been a game-changer. It stays flexible even after months of use, and I can fold it up when guests come over without worrying about permanent creases. It’s also the easiest to clean—soap scum just wipes right off instead of building up in all the little crevices.
One thing I didn’t consider at first: drainage holes are crucial. I bought this beautiful mat with a solid design, and water would pool on top of it during my shower. Not only was it gross, but that standing water would seep underneath and break the suction. Now I only buy mats with plenty of drainage holes or a perforated design.
nstallation and Placement Strategies
Getting your mat to stick properly is actually a bit of an art form. I used to just slap mine down and hope for the best, but there’s a better way.
Proper Surface Preparation
This part feels tedious, but I promise it makes all the difference. Before installing a new mat—or reinstalling your current one—you need to clean both surfaces like you’re prepping for surgery.
I use a mixture of white vinegar and dish soap to clean my tub before putting down a mat. The vinegar cuts through soap scum and mineral deposits that you can’t even see, and the dish soap handles any oily residue. I scrub with one of those non-scratch sponges, rinse thoroughly, and then—this is the part I always rushed before—I dry everything completely with a towel.
Wet surfaces and suction cups don’t play well together. I learned this after wondering why my mat would stick great one day and slide the next. Turns out, I was installing it on a still-damp tub surface, which prevented proper suction. Now I even use a hair dryer on the tub surface if I’m in a hurry. It sounds excessive, but it works.
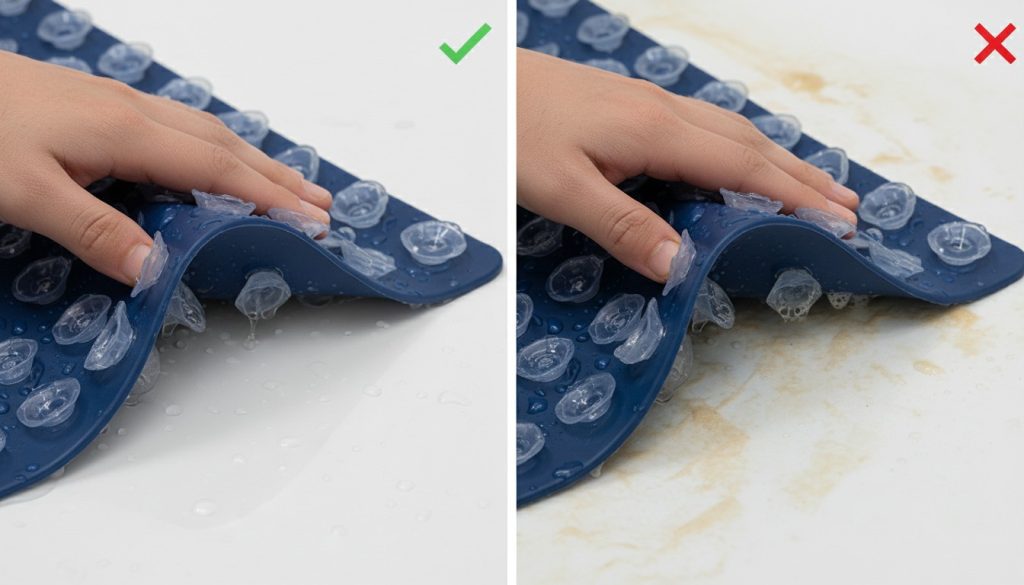
Don’t forget to clean the mat itself, too. New mats often have a manufacturing residue, and old mats accumulate buildup on the suction cups. I wash mine with dish soap and warm water, paying special attention to each suction cup. A clean suction cup is a happy suction cup.
Placement in Bathroom for Maximum Safety
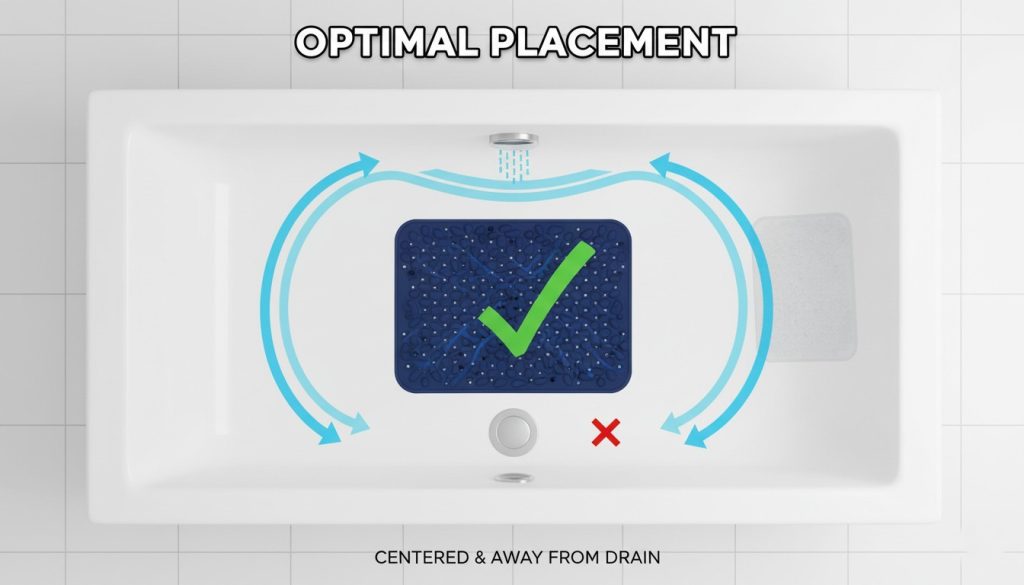
Where you put your mat matters more than I ever realized. Inside the tub, I position mine away from the drain—maybe six inches back—so water can flow freely without pooling under the mat. I also keep it centered in the tub, which gives me stable footing no matter which direction I’m facing.
I tried putting my mat right up against the back wall of the tub, thinking it would give me maximum coverage. Bad idea. Water would rush down the wall, get trapped under that edge, and lift the mat. Now I leave a small gap, and water can escape naturally.
For the mat outside the tub, placement is about traffic patterns. I used to center it directly in front of the tub, but I’d always end up stepping half-on, half-off because of how I naturally exited. Now I position it slightly to the side where my foot actually lands first. It sounds obvious in hindsight, but it took several stubbed toes to figure out.
Correct Installation Technique
Here’s my installation ritual, which probably looks ridiculous but works every time: I place the mat in position, then press down firmly in the center with both hands. From there, I work outward in a circular pattern, pressing down every few inches to make sure each suction cup engages.
The key is getting all the air bubbles out. If you just press the center and hope for the best, you’ll have air pockets that prevent suction. I actually lift the edges slightly as I go, which helps air escape and creates better vacuum pressure.
Once I think it’s secure, I do the “step test.” I step on different parts of the mat, shifting my weight and trying to make it move. If any section lifts or slides even slightly, I peel that area up and reapply it. This might seem paranoid, but it’s saved me from more than one potential slip.
Special Solutions for Challenging Surfaces
Not all tubs are cooperative, and this is where things get interesting.
Use on Textured Tubs and Non-Smooth Surfaces
My current apartment has one of those textured tub bottoms with little raised bumps that are supposed to be anti-slip on their own. Plot twist: they’re not nearly enough, especially with soapy water. But those bumps also mean standard suction cups don’t work at all—there’s no smooth surface for them to grip.
I went through three different mats before I found one that worked. The first two were standard suction cup designs that just sat there uselessly, sliding around like hockey pucks. The breakthrough came when I found a mat specifically designed for textured surfaces. Instead of suction cups, it had a completely different backing with thousands of tiny silicone nubs.
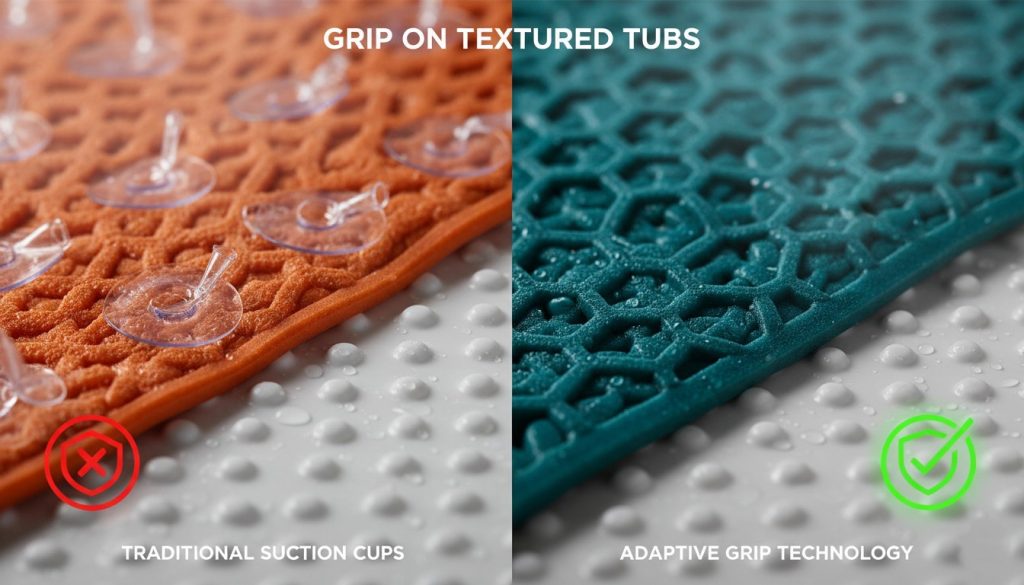
This mat works through friction rather than vacuum pressure. The silicone backing molds around the texture, creating grip through surface contact. It’s not quite as secure as suction cups on a smooth surface, but it’s worlds better than nothing. I’ve been using it for four months now, and it hasn’t budged.
For really stubborn textured surfaces, I’ve heard people have success with adhesive-backed mats, though I haven’t tried one myself. The idea of semi-permanently attaching something to my rental tub makes me nervous, but if you own your home and nothing else works, it might be worth exploring.
Acrylic, Fiberglass, and Tile Considerations
Different tub materials have different personalities. My old fiberglass tub was smooth but slightly flexible, which meant suction cups would stick initially but then gradually release as the tub surface gave a little under pressure. Acrylic tubs are better because they’re more rigid, but they can develop a slightly porous surface over time that reduces suction.
Tile shower floors present their own challenge—the grout lines. I tried using a regular mat in a tiled shower at my gym, and the suction cups that landed on grout lines just didn’t stick. The mat would be secure in some spots and loose in others, creating an uneven, unstable surface. For tile, you really need a mat with smaller, more numerous suction cups so more of them land on actual tile rather than grout.
Additional Methods for Preventing Sliding
Sometimes the mat itself isn’t enough, and you need to get creative. These are my backup strategies for when a mat just won’t cooperate.
DIY Enhancement Techniques
I’m not usually a DIY person, but I’ve learned a few tricks that actually work. The simplest one? Small strips of that clear, waterproof double-sided tape. I put them in the corners of a mat that kept lifting, and it made a huge difference. You can find this tape in the weatherproofing section of hardware stores—it’s meant for sealing windows, but it works great in bathrooms.
For a mat that was sliding but not lifting (different problem, different solution), I tried those rug gripper pads. You know, the mesh-like things people put under area rugs? I cut a piece to fit under my outside-the-tub mat, and it transformed it from slippery to stable. Just make sure you get one that’s designed for wet areas—regular rug pads can get gross and mildewy in bathroom humidity.
Here’s a weird one that I was skeptical about but actually works: tiny dots of clear silicone caulk. I put several small dots (maybe the size of a pencil eraser) on the bottom of a mat, let them dry completely, and it created extra grip points. The trick is keeping them small—big globs look messy and can actually make things worse. This is more of a last-resort option, and it’s semi-permanent, so probably not great for rentals.
Maintenance for Long-Term Stability
I used to think “maintenance” meant occasionally rinsing the mat when it looked gross. Turns out, there’s a bit more to it if you want consistent performance.
Now I give my mat a thorough cleaning every two weeks. I remove it completely, scrub it with a soft brush and dish soap, paying extra attention to the suction cups. I’ve found that even when the top looks clean, the bottom can have buildup that affects suction. After washing, I let it air dry completely before reinstalling—usually I just drape it over the shower rod overnight.
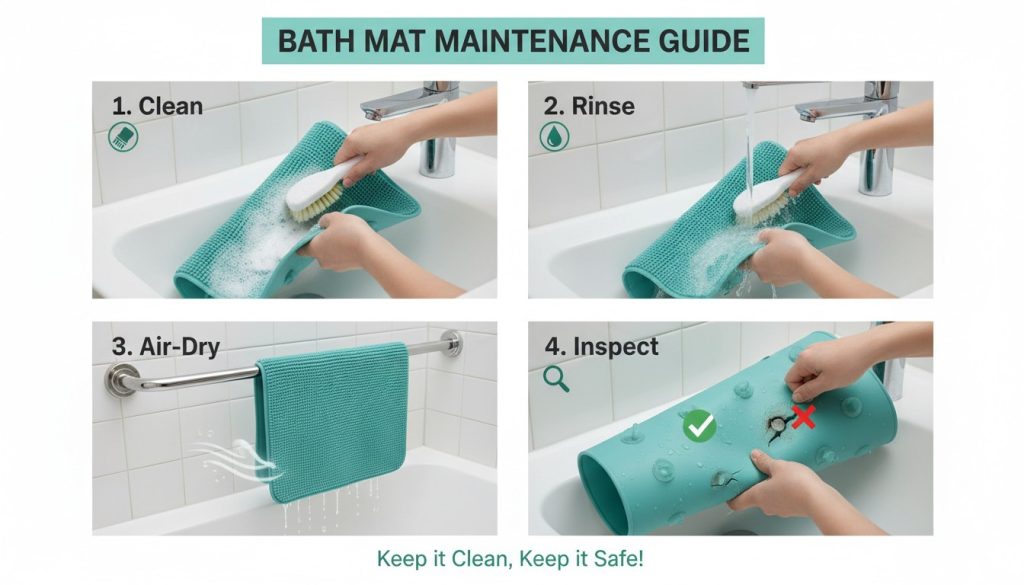
Every month or so, I also check the suction cups for damage. I run my finger over each one, feeling for cracks, tears, or hard spots. If more than a few cups are damaged, it’s replacement time. I used to try to stretch the life of mats, but I learned that a deteriorating mat is actually less safe than no mat at all—it gives you false confidence.
One thing that helped extend my mat’s life: flipping it over when I’m not using it. If the suction cups stay compressed against the tub for weeks on end, they can develop “memory” and lose their shape. When I know I’ll be away for a few days, or when guests are using the other bathroom, I flip my mat suction-side-up to let those cups relax and recover.
Complementary Safety Measures
Look, I’m a belt-and-suspenders kind of person when it comes to not falling on my face in the bathroom. The mat is your first line of defense, but it shouldn’t be your only one.
I installed a grab bar in my shower after my sliding incident, and honestly, I don’t know why I waited so long. It cost about $30 and took 20 minutes to install (into studs—do NOT trust those suction cup grab bars). Having something solid to hold onto while stepping in and out gives me confidence, and I use it way more than I expected.
I’ve also experimented with anti-slip spray coatings for the tub itself. These create a slightly textured surface on otherwise smooth tubs. I used one in my previous apartment, and it helped, though it wore off after about six months and needed reapplication. The nice thing is you can use it in conjunction with a bath mat for double protection.
The key is layering your safety measures. The mat handles the primary stability, the grab bar gives you something to hold, and good bathroom lighting helps you see what you’re doing. It might seem like overkill, but when you’re dealing with wet, soapy surfaces, redundancy is your friend.
Troubleshooting Common Problems
Even with perfect installation, things can go wrong. Here’s how I’ve dealt with the most common issues.
When corners lift, it’s usually an air bubble problem or uneven pressure. I peel up the entire corner section, spray a tiny bit of water on both the tub and the mat (counterintuitive, but it helps the suction cups slide into perfect position), then press down firmly while smoothing outward. The water helps eliminate air pockets, and then the suction does its thing as it dries.
For suction cups that just won’t hold anymore, I’ve had success with a revival technique a plumber friend taught me. Boil water, pour it over the suction cups (in a sink, not on your tub!), and let them soften for a minute. Then immediately place them in ice water. The rapid temperature change can help the material regain some flexibility. It doesn’t work miracles, but I’ve gotten a few extra months out of mats this way.
Water pooling underneath is tricky. Sometimes it means your drainage holes are clogged with soap scum or hair (gross, I know). Other times, it means water is flowing under the mat from the sides. I combat this by making sure the mat is positioned so water flows away from it, not toward it. If your showerhead sprays directly at the mat, try angling it differently or repositioning the mat slightly.
I’ve also noticed seasonal changes affect mat performance. In humid summer months, everything in my bathroom feels slightly damp all the time, and my mat sometimes loses suction. During winter, the rubber can get a bit stiffer. I adjust by cleaning more frequently in summer and making sure the mat is fully warmed up (from shower water) before relying on it in winter.
Product Recommendations and What to Look For
After all my trial and error, here’s what I look for when shopping for a new bath mat.
First, I check the suction cup situation. I want to see at least 50-100 suction cups, depending on the mat size. They should be substantial—not those tiny decorative ones that don’t really do anything. I also prefer mats where the suction cups cover most of the bottom surface rather than just being around the edges.
Material-wise, I’m all about silicone now. It’s more expensive upfront, but it lasts longer and maintains its grip better than PVC or thin rubber. That said, a thick rubber mat with quality suction cups is a solid second choice and usually more affordable.
Look for drainage holes or a perforated design. You want water to flow through the mat, not pool on top or get trapped underneath. I also check that the holes are large enough that they won’t clog with hair and soap scum immediately.
Read reviews, but read them smartly. I ignore the five-star reviews that just say “great mat!” and the one-star reviews from people who clearly didn’t clean their tub first. I look for detailed reviews from people who mention their specific tub type and how long they’ve been using the mat. Three- and four-star reviews are often the most honest and helpful.
Budget versus premium is a real consideration. I’ve used $10 mats that worked fine for six months, and I’ve used $40 mats that lasted two years. The premium ones typically have better materials, more suction cups, and nicer designs, but they’re not always necessary. For a standard smooth tub, a mid-range mat ($20-25) usually hits the sweet spot of quality and value.
Stay Safe and Slip-Free
Learning how to keep bath mat from slipping has been more of a journey than I ever expected. From my initial scary slide to becoming a bath mat expert (a title I never thought I’d claim), I’ve learned that success comes from combining the right product with proper installation and consistent maintenance.
The truth is, there’s no single magic solution. Your bathroom is unique—different surfaces, different water pressure, different soap products—and what works perfectly in my shower might need tweaking in yours. The good news is that with the strategies I’ve shared, you can troubleshoot and adapt until you find your perfect setup.
Take a few minutes today to assess your current bath mat situation. Is it actually secure, or are you just hoping for the best every time you step on it? Check those suction cups, give your tub a good cleaning, and reinstall your mat properly. Your future self—the one who doesn’t slip and grab frantically at the shower curtain—will thank you.
Because at the end of the day, bathroom safety isn’t about being paranoid or overcautious. It’s about creating a space where you can shower, relax, and start your day without that split-second of panic when your foot hits the mat. And trust me, once you’ve got a mat that truly stays put, you’ll wonder how you ever lived without it.
Leave a Reply