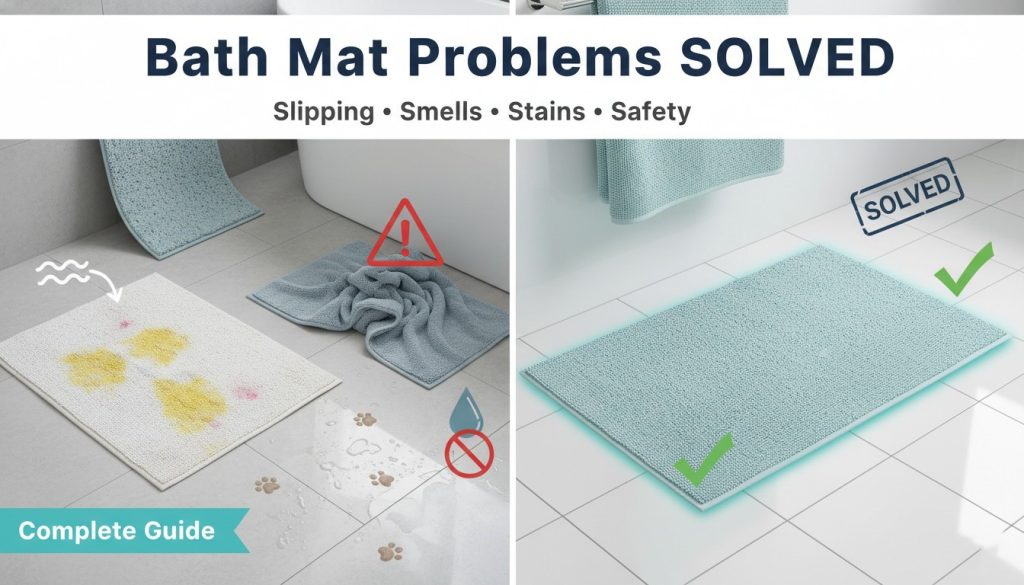
I’ll be honest—I never thought I’d become someone who has opinions about bath mats. But after dealing with a slippery disaster that nearly sent my mother-in-law to the emergency room during a visit, followed by a mysterious pink stain that appeared seemingly overnight, I’ve learned more about these bathroom essentials than I ever wanted to know.
The thing is, bath mats face an impossible job. They’re supposed to absorb water, stay put on slippery floors, dry quickly, resist mildew, look presentable, and somehow survive pets, kids, and daily abuse. It’s no wonder they develop problems. Over the years, I’ve dealt with just about every bath mat issue imaginable, and I’m sharing what I’ve learned so you don’t have to go through the same frustrations.
The Slipping Problem: Understanding Why Bath Mats Won’t Stay Put
What Causes Bath Mats to Slide Around?
Let me paint you a picture: It’s 6 AM, you’re half-asleep, you step out of the shower onto your bath mat, and suddenly you’re doing an involuntary split routine across the bathroom floor. Not fun. This happened to me more times than I’d like to admit before I figured out what was actually going on.
The main culprit is usually your flooring. Tile, laminate, and even some sealed hardwood floors are incredibly smooth—which is great for cleaning but terrible for keeping mats in place. When you add water to the equation (and there’s always water in a bathroom), you’ve essentially created an ice rink. I learned this the hard way with my beautiful porcelain tile floor that looked stunning but turned every bath mat into a skating rink.
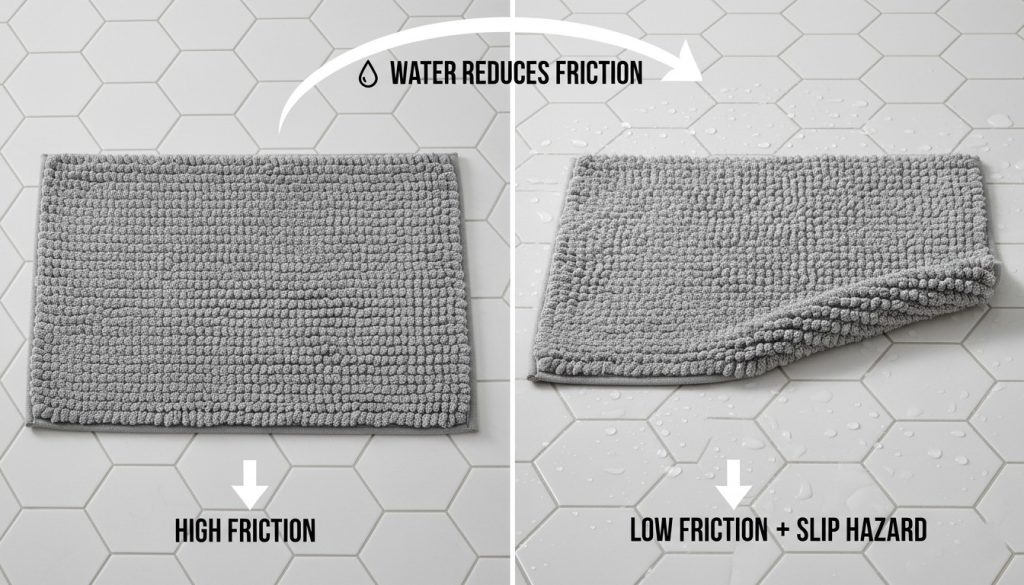
The backing on your mat matters enormously. I used to buy those cute cotton mats from home goods stores without thinking twice about what was on the bottom. Most had this thin rubber backing that worked fine… for about three months. After repeated washing and drying, the rubber would harden and crack, losing all its grip. I’d find myself readjusting the mat multiple times a day.
Weight plays a role too. Those lightweight, fluffy mats that feel luxurious under your feet? They’re also the ones most likely to slide around. I discovered this when I switched from a thick memory foam mat to a thin microfiber one—suddenly, I was chasing my bath mat around the bathroom daily.
Solutions for a Slip-Free Bathroom
After my mother-in-law’s near-miss, I became obsessed with finding solutions. The first thing I did was invest in a proper rug gripper pad. I’m talking about the kind you cut to size—not those flimsy mesh things that bunch up in the washing machine. I placed mine between the floor and the mat, and the difference was immediate. No more sliding, even when the floor was soaking wet.
For mats that came with mediocre backing, I learned a trick from a hotel housekeeper I chatted with during a vacation. She suggested applying lines of silicone caulk (the clear, waterproof kind) to the underside in a crosshatch pattern. Let it dry completely for 24 hours, and you’ve essentially created your own non-slip backing. I did this with two of my existing mats, and they’ve stayed put for over a year now.
Suction cup mats work brilliantly—but only on perfectly smooth surfaces. I tried these in my upstairs bathroom with textured tile, and they were useless. But in my powder room with smooth porcelain? They stick like they’re glued down. The key is making sure both the floor and the suction cups are completely clean and dry before you place the mat. Any soap residue or moisture will prevent a good seal.
If you’re dealing with an elderly family member or anyone with mobility issues, I can’t stress this enough: invest in a proper non-slip mat, even if it costs more. After scaring myself with my mother-in-law’s slip, I bought heavy-duty medical-grade non-slip mats for both my bathrooms. They’re not the prettiest things I own, but they absolutely don’t move. The peace of mind is worth every penny.
Battling the Stink: What Makes Bath Mats Develop Unpleasant Odors
The Science Behind Musty, Mildew-Scented Mats
There’s a special kind of embarrassment that comes with walking into your own bathroom and being hit with that musty, sour smell. I remember having guests over and frantically lighting candles, convinced they could smell what I was smelling. Spoiler alert: they probably could.
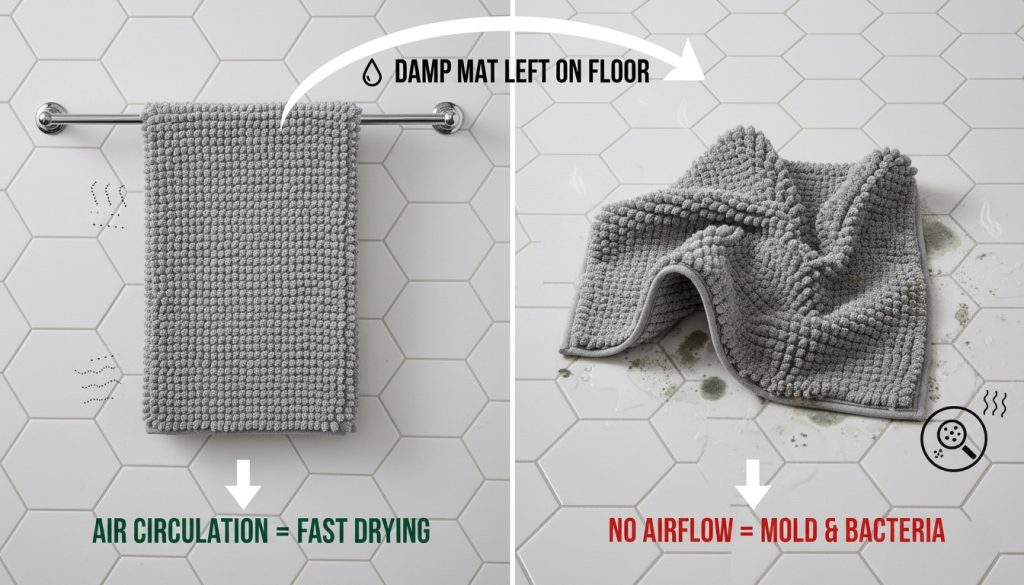
Here’s what I learned: bath mats are basically bacteria and mildew magnets. Every time you step on one with wet feet, you’re adding moisture to an already damp environment. In my poorly ventilated main bathroom, this created the perfect storm. The mat would feel slightly damp to the touch even hours after showering, and that constant moisture was feeding all sorts of microscopic nasties.
I made the mistake for years of leaving my bath mat on the floor 24/7. It seemed like the obvious thing to do—it’s a bath mat, it goes on the bathroom floor, right? Wrong. Without proper airflow underneath, even “quick-dry” materials stay damp. I noticed the smell was always worse in summer when the humidity was high, and practically nonexistent in winter when I ran the heat more often.
The real wake-up call came when I pulled up my favorite plush mat one day and found a dark spot underneath—actual mildew growing on the tile grout. That was my “I need to change something” moment.
Keeping Your Mat Fresh
Now I’m religious about mat care, and my bathroom has never smelled better. The single most effective change I made was hanging my bath mat to dry after every shower. I installed a simple towel bar on the back of the bathroom door specifically for this purpose. The mat hangs there until it’s completely dry—usually takes about 4-6 hours—before I put it back on the floor.
Washing frequency was another area where I was failing miserably. I used to wash my bath mats maybe once a month, thinking they were fine because I was clean when I stepped on them. But here’s the thing: soap residue, dead skin cells, and moisture build up faster than you think. Now I wash mine weekly, and the difference is night and day. No more smell, no more weird discoloration.
I throw them in the washing machine with hot water and a cup of white vinegar along with my regular detergent. The vinegar cuts through any soap buildup and kills odor-causing bacteria without damaging the mat. My grandmother taught me this trick, and it works better than any fancy cleaning product I’ve tried. Just make sure to skip the fabric softener—it can actually reduce absorbency and make mats more slippery.
Drying is crucial. I used to toss my mats in the dryer on high heat because I was impatient. Big mistake. The high heat degraded the rubber backing on several of my mats, making them less effective. Now I use low heat or air dry, and my mats last much longer. For my stone mat (more on that later), I learned it can only air dry—no dryer at all.
If your bathroom has poor ventilation like mine did, run the exhaust fan for at least 30 minutes after showering. I actually put a timer switch on mine because I kept forgetting to turn it off, and now it runs automatically. This simple change reduced the overall humidity in my bathroom dramatically, which means everything—not just the bath mat—stays fresher.
Stone and Diatomaceous Earth Mats: The Warping Dilemma
Why These Modern Mats Lose Their Shape
I jumped on the stone bath mat trend about two years ago after seeing them all over social media. The promise was irresistible: a mat that dries almost instantly, never smells, and feels cool and spa-like under your feet. I ordered one, eagerly awaited its arrival, and for the first few months, I was a total convert. Then one morning, I noticed it was rocking when I stepped on it. By month four, it had a visible curve to it.
Here’s what nobody tells you about these mats: they’re finicky. The material—usually diatomaceous earth or a similar absorbent stone composite—is somewhat porous and absorbs water quickly. But if that water doesn’t evaporate evenly, the mat can warp. I made the rookie mistake of leaving mine flat on the floor all the time, which meant the top dried faster than the bottom.
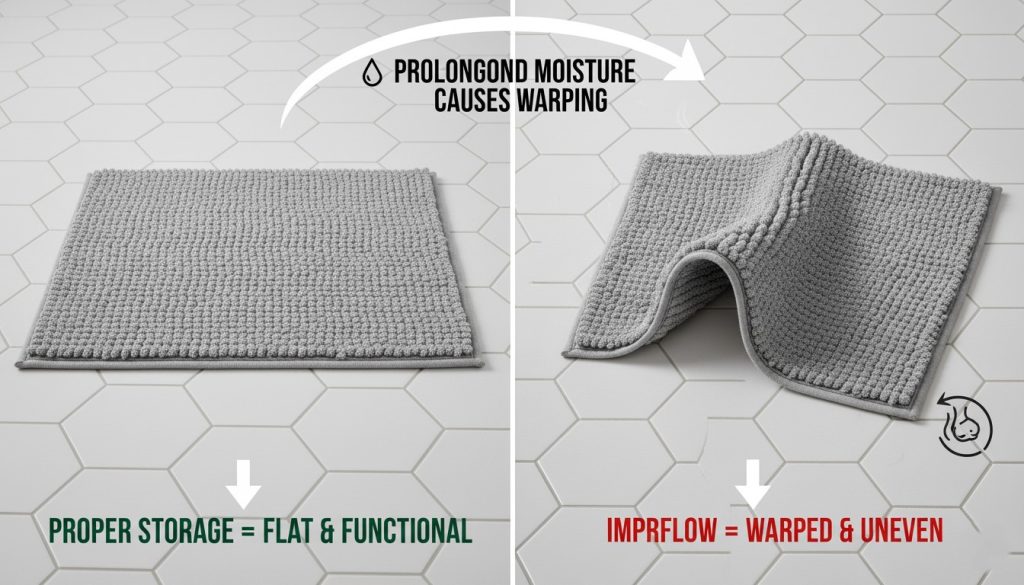
Temperature changes don’t help either. My main bathroom gets full afternoon sun through a large window, and I noticed the warping got worse during summer. The heat would make one side expand slightly more than the other, and over time, this created a permanent bend. It’s like those cutting boards that warp if you don’t care for them properly—same principle.
Quality matters enormously with these mats, and I learned this the expensive way. My first mat cost about $25 and warped within four months. Frustrated, I bought a higher-end version for $60, thinking maybe I’d just gotten a dud. The pricier one has lasted over a year with minimal warping, which tells me the material composition and manufacturing process make a huge difference.
Preventing and Fixing Warped Stone Mats
After ruining my first stone mat, I got serious about proper care. The key is to store it vertically or at an angle after use—not flat on the floor. I prop mine against the wall next to the shower, leaning at about a 45-degree angle. This allows air to circulate on both sides and helps it dry evenly. It looks a little odd, but it works.
Never, and I mean never, put these in the dryer. I didn’t make this mistake personally, but a friend did, and her mat cracked in multiple places. The heat is too intense for the material. Air drying only, and ideally in a position where both sides get airflow.
If your mat has already started to warp slightly, I found a trick that sometimes works: lay it flat under a heavy, flat object (I used a large cutting board with some books on top) in a cool, dry place for several days. This won’t fix severe warping, but for minor curves, it can help straighten things out. I did this with my second mat when it started showing early signs of warping, and it seemed to help.
When shopping for a stone mat, look for ones that are at least 12mm thick. The thinner ones (around 9mm) seem more prone to warping in my experience. Also, check reviews specifically mentioning warping issues—if multiple people report the same problem, that’s a red flag about quality control.
The White Mat Challenge: Keeping Light Colors Pristine
Why Lighter Shades Show Every Speck
I have a love-hate relationship with white bath mats. They look so clean and spa-like when they’re new, making your bathroom feel fresh and luxurious. But maintaining that pristine look? That’s another story entirely. I bought a gorgeous white memory foam mat with a subtle textured pattern, thinking it would add a touch of elegance to my bathroom. Within two weeks, it had gray footprint patterns permanently embedded in the foam.
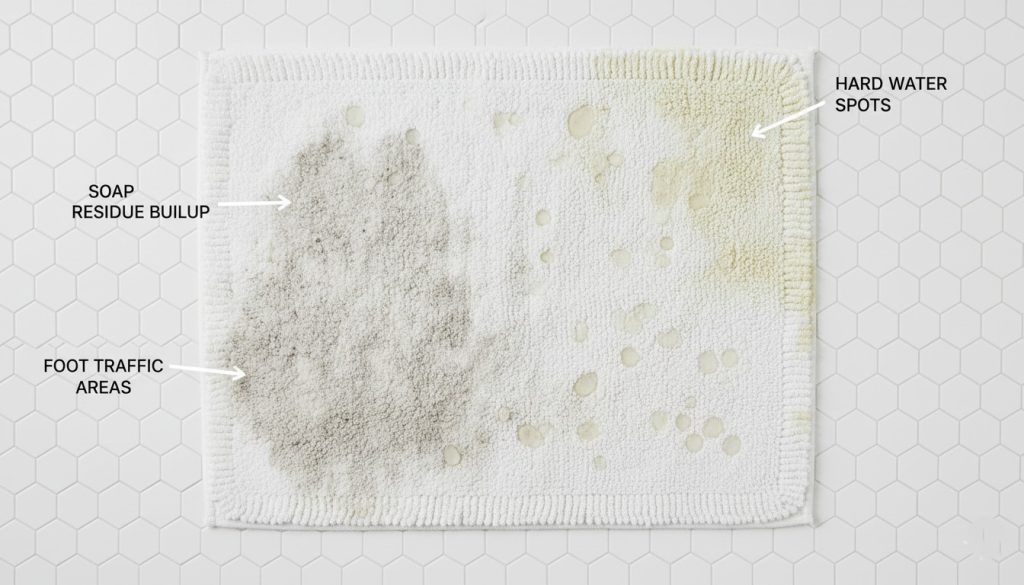
The problem with white or light-colored mats is that they’re essentially a canvas for every bit of dirt, soap scum, and mystery grime that comes off your body. I never realized how much stuff accumulates on the bottom of clean feet until I had a white mat. The high-traffic areas—where you step most frequently when getting out of the shower—develop these dingy gray patches that make the whole mat look dirty, even right after washing.
Hard water stains were my biggest nemesis. I live in an area with extremely hard water, and I’d notice these yellowish-brown spots appearing on my white mat, especially near where water would drip while I dried off. It took me forever to realize these were mineral deposits, not actual dirt. Regular detergent did absolutely nothing to remove them.
Makeup and skincare products were another culprit I didn’t anticipate. I’m usually careful, but apparently not careful enough. A tiny bit of foundation here, some self-tanner residue there, and suddenly my white mat had these faint orangey-brown streaks that looked terrible. If you have teenagers who do their makeup in the bathroom, multiply this problem by ten.
Maintenance Strategies for White and Light-Colored Mats
After almost giving up on light-colored mats entirely, I developed a system that actually works. The key is prevention and immediate action. I keep a small spray bottle with a 1:1 mixture of water and white vinegar near my bathroom. After my shower, while I’m getting ready, I do a quick spray on any visible spots and let it sit while I do my hair. Then I blot it with a towel before hanging the mat to dry. This thirty-second routine has prevented so many stains from setting.
For washing, I pre-treat every single time. I spray the entire mat—especially the high-traffic areas—with a stain remover about fifteen minutes before throwing it in the washing machine. I use the kind designed for laundry, not the carpet stain removers (I tried that once and it was a disaster). This extra step makes a significant difference in keeping the mat looking fresh.
I learned to use oxygen bleach (like OxiClean) instead of chlorine bleach for my white mats. Chlorine bleach can yellow some fabrics over time, especially cotton blends, and it’s harsh on rubber backing. Oxygen bleach is gentler but still effective at brightening. I add about half a cup to my regular wash cycle, and it’s brought several of my mats back from the dead.
One trick that surprised me: washing my feet before stepping on the mat. I know it sounds silly—you just showered, right? But I started quickly rinsing my feet as the very last thing before stepping out, especially focusing on the soles. This simple habit dramatically reduced the dirt transfer to my mat. The difference was noticeable within a week.
For stubborn hard water stains, I make a paste with baking soda and a little water, scrub it directly onto the spots with an old toothbrush, let it sit for 30 minutes, then wash as usual. This has saved several mats I thought were beyond hope. It takes some elbow grease, but it works.
Honestly though? After years of fighting to keep white mats pristine, I’ve mostly switched to light gray or beige for my high-traffic bathrooms. They still look clean and modern, but they hide the inevitable wear much better. I reserve white mats for my guest bathroom that gets used maybe once a week. Sometimes the best solution is accepting reality and adjusting your color choices.
Color Changes: From Yellow to Orange to Pink Transformations
Understanding Mysterious Discoloration
Nothing prepared me for the morning I walked into my bathroom and found that my cream-colored bath mat had developed distinct orange patches overnight. I genuinely thought something had spilled on it. I checked for rust, looked for dropped products, interrogated my husband—nothing. The orange just… appeared. This sent me down a rabbit hole of research that taught me more about bathroom chemistry than I ever wanted to know.
Yellowing is usually the most gradual transformation. I noticed my white mats would slowly take on a dingy yellow tinge, especially around the edges. This turned out to be a combination of soap scum, body oils, and hard water minerals building up in the fibers. The minerals in my water—particularly calcium and magnesium—would bond with soap residue and create these yellowish deposits. It’s the same thing that causes the yellow ring around your bathtub, just in fabric form.
Orange discoloration was my mystery stain situation. After extensive research and some trial and error, I discovered I had iron in my well water. When iron-rich water sits on fabric and then oxidizes (rusts), it creates orange stains. I also learned about a bacteria called Serratia marcescens that can cause orange-pink staining in damp environments. Fun fact I didn’t need to know: this bacteria feeds on soap residue and loves moisture. Basically, it thought my bath mat was a five-star buffet.
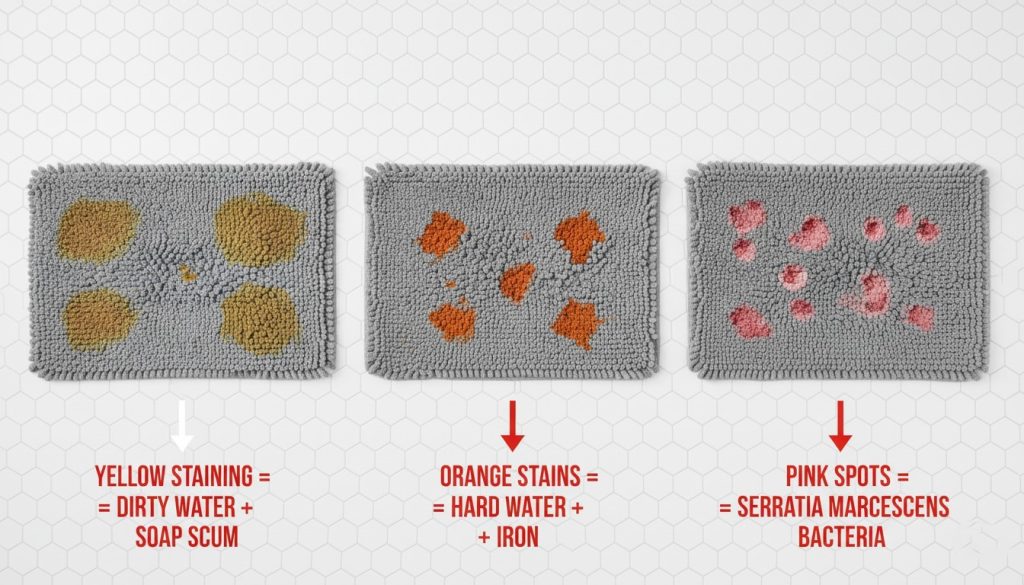
Pink staining was particularly frustrating because it showed up on my newer mats first. Those bright pink spots looked almost neon against my light gray mat. This is almost always bacterial growth—specifically airborne bacteria that thrive in humid, warm environments. I noticed it was worse in summer and in my basement bathroom that had poor ventilation. The bacteria don’t just discolor the mat; they can also contribute to that musty smell I mentioned earlier.
Tackling Each Type of Discoloration
For yellowing, I found that regular vinegar soaks work wonders. Once a month, I fill my bathtub with hot water, add two cups of white vinegar, and let my mats soak for an hour before washing them normally. The vinegar breaks down the mineral deposits and soap scum. The first time I did this, the water turned noticeably cloudy—kind of gross, but also satisfying to see all that gunk coming out.
Dealing with orange stains required a different approach. After confirming I had iron in my water (a simple water test kit from the hardware store), I started using a rust remover specifically designed for fabrics. Bar Keeper’s Friend made a product that worked, though I had to be careful not to use it on mats with rubber backing too frequently. The better long-term solution was installing a water softener, which wasn’t cheap but solved multiple problems beyond just my bath mats.
For those orange-pink bacteria stains, I learned that regular bleaching wasn’t enough—you have to actually kill the bacteria and improve conditions so they don’t come back. I started washing affected mats in the hottest water they could handle with oxygen bleach, then ensuring they dried completely between uses. I also started running my bathroom exhaust fan more religiously and wiping down surfaces weekly with a diluted bleach solution to reduce the bacterial load in the room overall.
One surprising discovery: sunlight is an amazing natural bleaching agent. When weather permits, I hang my mats outside in direct sunlight to dry after washing. The UV rays help kill bacteria and naturally brighten fabrics. I’ve had mats with stubborn discoloration that noticeably improved after just a few hours in the sun. My grandmother used to do this with linens, and I never understood why until I tried it myself.
Prevention is still easier than treatment. I test my water quality annually now, clean my bathroom more thoroughly (including areas I used to skip, like behind the toilet and inside cabinets where moisture can hide), and I replaced my old exhaust fan with a more powerful one. These changes have dramatically reduced all types of discoloration issues.
Pets and Bath Mats: A Complicated Relationship
Why Cats Target Your Bathroom Mat
Let me tell you about the six months of my life when I was convinced my cat was plotting against me specifically through bath mat destruction. I’d wash the mat, put it back, and within days find a suspicious wet spot. Then came the scratching—long pulls in the fabric that made my mats look like they’d been through a war.
After consulting with my vet (yes, I got that desperate), I learned that cats are attracted to bath mats for several reasons, and none of them are about spite, despite what I believed. The absorbent material reminds them of litter—soft, digestible, and good for covering things up. My vet explained that if a cat is having any litter box aversions—maybe it’s not clean enough, in a location they dislike, or they’re stressed about something—they’ll seek out alternative spots that feel “appropriate.” Apparently, soft, absorbent bath mats check all the boxes.
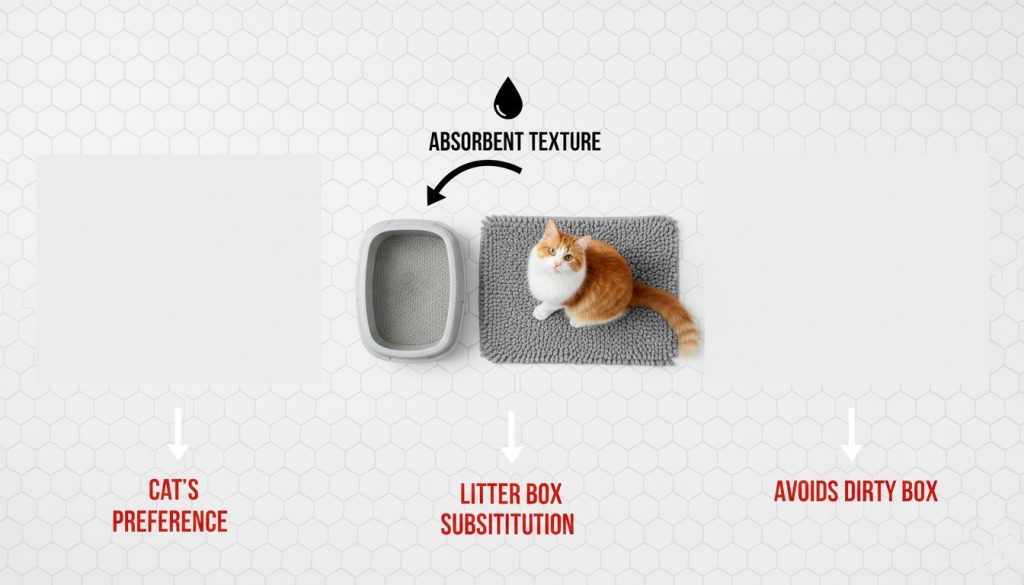
The scratching behavior was different. My cat, like many cats, needs to scratch to maintain their claws and mark territory. The textured surface of bath mats—especially shag or looped styles—provides perfect resistance. It feels good for them, so they keep doing it. I was buying new mats every few months before I figured this out.
Territory marking also plays a role. Bathrooms have concentrated human scents, and some cats feel the need to add their own scent (through scratching or urination) to establish the space as shared territory. This was apparently more likely because we’d recently moved, and my cat was stressed about the new environment.
Dog and Other Pet Considerations
Dogs present their own challenges, though they’re usually less destructive than cats in my experience. My sister’s golden retriever taught me about the wet paw problem. After letting the dog out in the rain, he’d head straight to the bathroom for a drink from his water bowl, leaving a trail of muddy paw prints across her bath mat. Within a week, her white mat looked like a Jackson Pollock painting done in mud.
Dogs with anxiety issues sometimes chew on bath mats, especially puppies. A friend’s labrador puppy destroyed three mats in two months before she figured out the dog needed more chew toys and exercise. The soft, cloth texture apparently felt good to teeth and gums.
Hair accumulation is real with dogs, especially long-haired breeds. My sister started finding clumps of golden retriever fur embedded in her bath mat, even though the dog rarely stepped on it. The explanation: dogs shake off water, and that fur flies everywhere, landing in and adhering to anything nearby with texture. Her mat needed twice-weekly washing just to stay remotely presentable.
Pet-Proofing Your Bath Mat Situation
After my cat’s bath mat phase, I got creative with solutions. First, I addressed the litter box situation—moved it to a quieter location, got a larger box, and started scooping twice daily instead of once. This alone reduced the inappropriate urination by about 80%.
For the remaining 20%, I tried a deterrent spray designed for cats, spraying it lightly on the bath mat edges. It has a scent cats dislike but humans can’t really smell. Combined with enzymatic cleaner (crucial—regular cleaners don’t actually remove the scent markers that tell cats “I peed here before”), this eliminated the problem completely within a month.
I switched to smooth-textured mats instead of looped or shaggy ones. My cat showed zero interest in scratching these, and I placed a scratching post right outside the bathroom door to give her an appropriate alternative. Rewarding her with treats when I caught her using the post instead of the mat helped reinforce the behavior change.
For my sister’s dog situation, waterproof mats became the solution. She bought mats with a waterproof rubber backing and a quick-dry microfiber top. The paw prints still showed, but they dried quickly and didn’t stain. She also placed a smaller “entry mat” right inside the bathroom door specifically for catching dirty paws before they hit the main bath mat.
Quick cleanup protocols are essential with pets. I keep a small handheld vacuum in my bathroom closet for daily hair removal from mats. Takes thirty seconds and prevents buildup. For accidents, having enzymatic cleaner readily available means I can treat issues immediately before they become permanent problems.
The biggest lesson: pet-friendly bath mats exist, but you need to match the mat to your specific pet issues. Absorbent cotton isn’t great if you have a cat with litter box problems—go for microfiber or bamboo that feels different. If you have a shedding dog, choose mats where hair sits on top rather than embedding deep into fibers. And always, always keep spare mats on hand so you can rotate them while washing, because with pets, you’ll be washing frequently.
Safety First: Protecting Vulnerable Family Members
Special Considerations for Children
My perspective on bath mat safety completely changed when my nephew, then three years old, slipped getting out of the tub during bath time at my house. He wasn’t seriously hurt—just a scary moment and some tears—but it made me realize that what I considered “safe enough” for adults wasn’t actually safe for kids.
Young children have different balance and coordination than adults. They’re learning body awareness and movement control, which means they’re more prone to slips and trips. They also tend to move faster and more erratically—my nephew literally jumped out of the tub, landed on the mat, and the mat slid. I had been using a lightweight cotton mat that I thought was fine because it had rubber backing, but it wasn’t heavy or grippy enough to handle that kind of impact.
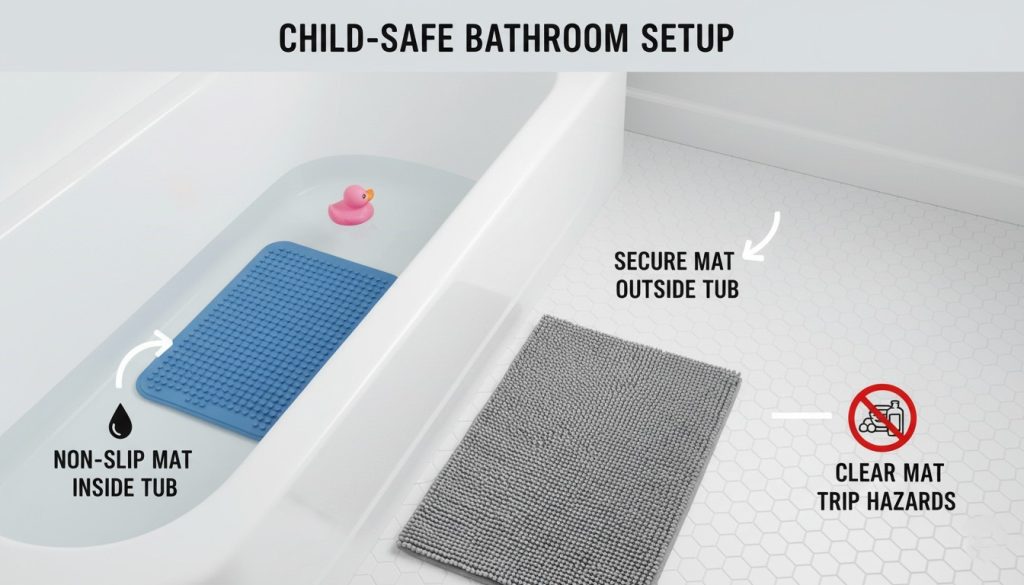
Supervision is obviously crucial, but creating an environment that’s physically safer reduces risk even when you’re watching carefully. After the slip incident, I bought a two-mat system for bath time: one suction-cup mat inside the tub for them to stand on during washing, and a heavy-duty, extra-grippy mat outside for stepping out onto. Both are brightly colored, which helps kids know where to step.
Teaching kids to use mats properly is something I hadn’t considered before becoming an aunt. I started making a game of it—”Can you step carefully onto the yellow mat?”—which turned safety awareness into a fun routine rather than a lecture. Kids respond better when they understand why something matters, so I explained in simple terms that the mat helps keep feet from slipping on the slippery floor.
Creating a Safer Bathroom for Elderly Individuals
The incident with my mother-in-law that I mentioned at the beginning of this article was a serious wake-up call. She’s in her seventies, and while she’s generally healthy and independent, she doesn’t have the reflexes or recovery ability she once had. A simple slip that I might catch myself from could result in a broken hip for her.
Statistics about elderly falls are sobering. According to what I learned researching after the incident, bathrooms are one of the most common places for falls among older adults, and bath mat-related slips are a significant contributor. The combination of wet surfaces, quick temperature changes affecting balance, and inadequate mat grip creates a perfect storm of risk factors.
I completely overhauled my bathroom setup with elderly visitors in mind. I replaced all my decorative mats with medical-grade non-slip mats—the kind you might see in hospitals or physical therapy centers. They’re not pretty, but they have extremely aggressive non-slip backing and significant weight. My mother-in-law now visits regularly without me having a panic attack every time she uses the bathroom.
For elderly individuals with walkers or canes, mat placement becomes critical. The mat needs to be large enough that they can fully step onto it while using their mobility device, but not so large that the edges create tripping hazards. I learned to position the mat so there’s a clear, straight path from the bathtub to the door, with no need to navigate around furniture or turn sharply on a wet mat.
Contrast colors made a surprising difference. My mother-in-law has some vision decline, and she mentioned that my previous beige mat on beige tile was hard to see. I switched to a dark blue mat on my light tile, creating high contrast that makes the mat’s boundaries obvious. This helps her place her feet accurately, reducing the risk of stepping partially on, partially off the mat and losing balance.
The mat thickness matters too. Very thick mats can create a tripping hazard at the edges, especially for someone who shuffles their feet or has reduced foot lift. I found that mats between 0.5 and 0.75 inches thick offered good cushioning without creating an obstacle to step over.
Universal Design Principles
Going through these experiences taught me that designing for safety doesn’t mean compromising for everyone else—it actually creates a better bathroom for everyone. Quick-drying materials benefit people of all ages because they reduce the window of time when slip hazards exist. Nobody enjoys stepping on a damp, musty mat hours after someone else showered.
Size matters more than I initially thought. Mats that are too small don’t provide adequate coverage, forcing people to step onto wet tile. Mats that are too large create edges that people can trip over, especially in smaller bathrooms where space is tight. I found the sweet spot for most standard bathrooms is 20×30 inches—large enough to catch most of the water, small enough not to be a tripping hazard.
A multiple-mat strategy works well if you have the space. I use a small, highly absorbent mat right at the shower/tub exit point, and a larger, thinner mat covering more floor space. This catches water at the source and provides dry footing for the entire post-shower routine. The smaller mat gets the heavy moisture load and needs washing more frequently, while the larger one stays drier and lasts longer.
Proper placement means thinking about movement patterns. I observed how people naturally move in my bathrooms and positioned mats accordingly. The mat shouldn’t force anyone to take an awkward step or turn sharply while wet. It should align with the natural path from shower to towel to sink.
Installation quality of non-slip features is something I now check regularly. I test my mats every few weeks by stepping on them and doing a gentle side-to-side shuffle. If there’s any movement, I either readjust the gripper pad underneath or replace the mat. It takes five seconds, but it’s caught several potential issues before they became problems.
Material Matters: Choosing the Right Bath Mat for Your Needs
Comparing Popular Options
After going through probably fifteen different bath mats over the years, I’ve developed strong opinions about materials. Each type has its place, but matching the material to your specific situation makes all the difference.
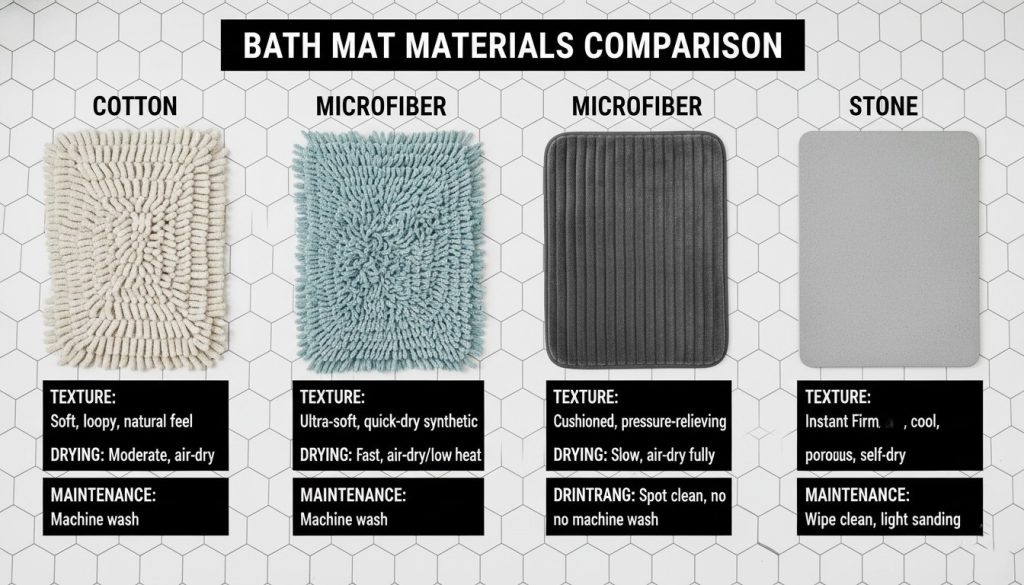
Cotton and microfiber were my first choices, and I still use them in certain situations. Cotton feels soft and luxurious underfoot—there’s something nice about that plush feel after a shower. But here’s the reality: cotton holds moisture like it’s its job (well, it kind of is). My cotton mats took hours to dry completely, even when hung up properly. In humid summer months, I’d sometimes find them still slightly damp the next morning. This makes them prone to mildew issues if you’re not diligent about washing.
Microfiber is cotton’s more practical cousin. It absorbs just as well but dries significantly faster. I have a microfiber mat in my main bathroom now, and it’s usually dry within 2-3 hours of hanging. The texture is different—less plush, more of a smooth feel—but I’ve grown to prefer it. The tradeoff is that microfiber can show footprints more obviously than cotton, especially in darker colors.
Memory foam felt like a luxury upgrade when I first tried it. That cushiony, supportive feel is genuinely comfortable, especially if you stand at the sink for a while doing your hair or skincare routine. But memory foam is a moisture retention nightmare. The foam core inside holds water, and even though the outer covering might feel dry, the inside stays damp. I started noticing a musty smell from mine within a month, and no amount of washing helped because I couldn’t get the core dry. I’ve since learned that memory foam mats are best for low-traffic guest bathrooms, not primary bathrooms with daily use.
Bamboo mats were my eco-friendly phase. They’re sustainable, naturally antimicrobial, and they look really nice—very spa-like. The slats allow water to drain through, which theoretically prevents standing water. In practice, I found that water still pools in the spaces between slats, and if you have any balance issues, the raised slat design can feel unstable underfoot. My biggest frustration was that small items—cotton balls, bobby pins—would fall through the gaps, and cleaning underneath became a hassle. I still use a bamboo mat in my guest bathroom where it’s more decorative than functional.
Stone and diatomaceous earth mats—I covered their warping issues earlier, but beyond that, they’re actually pretty great. The instant-dry feature isn’t an exaggeration; footprints literally disappear within seconds. There’s no fabric to wash, just occasional wiping down with a damp cloth. The cool feeling underfoot is refreshing, especially in summer. The downsides: they’re expensive, somewhat fragile (mine has a small chip from dropping it), and the texture takes getting used to. Some people find it too rough, though I don’t mind it.
Rubber and vinyl mats are purely functional, no pretense about aesthetics. I use these in situations where performance matters more than looks—like my elderly mother-in-law’s bathroom setup. They’re waterproof, they grip well, they’re easy to clean (you can literally spray them down), and they last forever. They’re also generally ugly and feel plasticky. But for safety-first situations, they can’t be beaten.
Matching Mats to Your Household
If you have pets, especially cats with litter box issues, avoid anything super absorbent like cotton or memory foam. Go for microfiber or bamboo—materials that feel distinctly different from litter. Also consider waterproof backing or fully synthetic materials that you can clean aggressively without worry. I learned this the hard way with too many ruined cotton mats.
For families with young children, prioritize grip and washability above all else. Kids are messy, and mats will need frequent washing. Microfiber or synthetic materials that can handle hot water and frequent laundering work best. Avoid anything with loops that tiny fingers or toes can catch in, and make sure the backing is aggressive enough to handle jumping or running (which they will do, no matter how many times you tell them not to).
In high-traffic bathrooms where multiple people shower daily, quick-drying materials are essential. Stone mats or thin microfiber work well here. Thick, plush mats will never fully dry between uses, leading to smell issues. I use a rotation system in my main bathroom—two mats that I alternate every other day, giving each one 48 hours to fully dry between uses.
For humid climates, think about mold and mildew resistance. Materials like stone, bamboo, or synthetic microfiber resist bacterial growth better than natural fibers. I visited family in Florida and was amazed at how quickly their cotton mats developed issues compared to mine in a drier climate. Climate absolutely matters for material choice.
In homes with elderly individuals or anyone with mobility challenges, material choice directly impacts safety. The medical-grade rubber mats might not be your first aesthetic choice, but their grip and stability are unmatched. Memory foam is actually dangerous for this population because it can shift underfoot when compressed unevenly.
Maintenance Schedule: A Year-Round Care Calendar
Creating a routine was the single biggest factor in extending my bath mats’ lifespan and keeping my bathroom fresh. I used to approach mat care reactively—washing only when they looked dirty or smelled bad. Now I’m proactive, and it’s made a world of difference.
Daily habits are surprisingly impactful for something that takes less than a minute. Every morning after my shower, I hang my bath mat over the towel bar or shower rod to dry. This one change eliminated about 80% of my odor problems. I also do a quick shake outside before hanging—it dislodges any loose hair, dust, or debris that accumulated overnight. If I notice any visible spots (makeup smudges, mystery stains), I hit them immediately with my vinegar spray solution before hanging. Treating stains fresh prevents them from setting and becoming permanent.
Weekly washing is now non-negotiable for my primary bathroom mats. Every Saturday morning, the bath mats go in the wash along with towels. I pre-treat any visible stains, add oxygen bleach to the wash, and use hot water (unless the mat’s care label says otherwise—I learned to actually read those after shrinking an expensive mat). For mats in less-used bathrooms, I wash every two weeks instead.
I also do a quick inspection each week when I remove the mats for washing. I check the backing for any signs of degradation—cracking, peeling, or hardening rubber. I test the grip by placing the mat on dry tile and doing that side-to-side shuffle I mentioned earlier. And I examine the fabric for any unusual wear patterns, thinning areas, or persistent discoloration that might indicate it’s time for replacement.
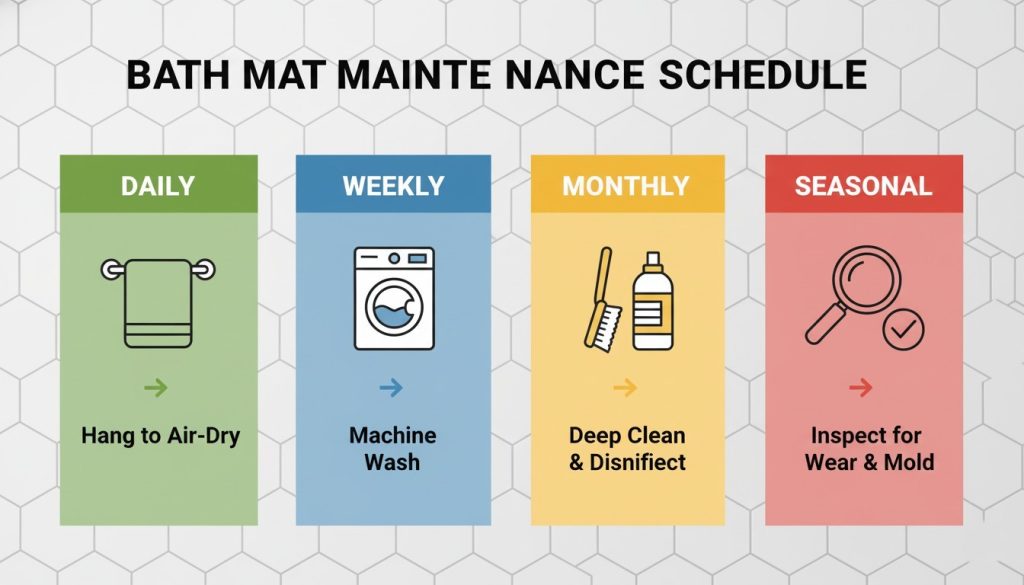
Monthly deep-cleaning happens on the first Sunday of each month. This is when I do the vinegar soak I mentioned earlier—filling the tub with hot water and two cups of white vinegar, letting the mats soak for an hour, then washing normally. I also clean the areas where mats sit, wiping down the floor underneath with a diluted bleach solution to prevent any bacterial or mildew buildup in the grout or tile.
For stone mats, monthly maintenance is different. I wipe them down with a damp microfiber cloth, let them dry completely, then very lightly sand the surface with fine-grit sandpaper (220 grit) to restore absorbency. The pores in the stone can clog with soap residue and body oils over time, reducing how quickly they dry. This light sanding reopens the pores. Takes about five minutes and keeps the mat performing like new.
Seasonal considerations weren’t something I thought about until I noticed patterns in mat problems. In summer, humidity is my enemy. I run the bathroom exhaust fan more religiously—at least 30 minutes after every shower, sometimes longer. I also wash mats more frequently, sometimes twice a week if it’s particularly humid. I keep windows open when possible to increase air circulation. During this season, I favor quick-dry materials and avoid anything thick or plush.
Winter brings its own challenges, mainly related to dry indoor air and heating. My mats actually dry faster in winter, but the dry air makes some materials feel rougher or even develop static electricity (cotton mats in particular). I noticed more dust clinging to mats in winter, so I vacuum them more frequently. The flip side: mildew and odor issues are minimal during cold months, so I can sometimes stretch washing to every 10 days instead of weekly without problems.
Spring and fall are my “replacement evaluation” seasons. In April and October, I assess each mat’s condition and decide whether it’s worth keeping or time to upgrade. I check for permanent stains, weakened backing, worn areas, or any degradation in performance. This twice-yearly evaluation prevents me from holding onto mats that have passed their prime. I learned that continuing to use worn-out mats is false economy—they don’t perform their function well and can actually become safety hazards.
Replacement timeline indicators became clearer to me with experience. If a mat’s backing is cracked or peeling in multiple places, it’s done—the grip will only get worse. If fabric mats have permanent stains that don’t respond to treatment, or if the material has thinned to the point of being nearly transparent in spots, they’re past their useful life. For stone mats, significant chips or cracks that affect stability mean replacement time.
I also learned to recognize when smell becomes permanent. If a mat still smells musty even immediately after washing and drying, bacteria or mildew has penetrated too deeply into the material to save it. I spent weeks trying to salvage a favorite mat before accepting this reality. Now if smell persists after two thorough wash-and-vinegar-soak cycles, the mat goes to the trash.
On average, I replace cotton or microfiber mats every 12-18 months in high-traffic bathrooms, longer in guest bathrooms. Memory foam mats lasted me about 8-10 months before smell issues became unmanageable. Rubber and vinyl mats can last 3-4 years or more if the backing stays intact. My stone mat is two years old and still going strong, though I expect I’ll eventually need to replace it if warping becomes too pronounced.
I keep detailed notes on when I bought each mat and what problems I’ve encountered. This sounds obsessive (okay, it is a little), but it’s helped me identify which brands and materials hold up best in my specific conditions. I’ve found that spending $30-40 on a quality mat that lasts 18 months is more cost-effective than buying $15 mats every six months.
Conclusion
Looking back at my bath mat journey—from that terrifying moment with my mother-in-law’s slip to becoming someone who has strong opinions about diatomaceous earth versus microfiber—I’ve learned that these seemingly simple bathroom accessories are actually complex problem-solvers. They need to manage water, resist bacteria, stay in place, look decent, and do all of this under challenging conditions.
The biggest lesson I’ve learned is that there’s no one perfect bath mat for every situation. The mat that works brilliantly in your low-humidity guest bathroom might be a disaster in a humid main bathroom with multiple daily users. The cute, plush cotton mat that feels luxurious might be completely wrong if you have cats or elderly family members visiting.
My current setup is the result of years of trial and error: microfiber mats with heavy-duty gripper pads in my primary bathrooms, a stone mat in my basement shower, bamboo in the powder room for looks, and medical-grade non-slip rubber mats ready to deploy when my mother-in-law visits. I hang every mat after use, wash weekly, deep-clean monthly, and replace without guilt when performance declines.
If you’re dealing with any of the problems I’ve covered—slipping, smell, warping, discoloration, pet issues, or safety concerns—start by identifying your specific challenge and your household’s unique needs. Match your mat material to your situation, commit to a maintenance routine (it’s really not that time-consuming once it becomes habit), and don’t be afraid to experiment until you find what works.
The peace of mind that comes from knowing your bathroom is safe, fresh, and functional is worth every bit of effort. Trust me, once you’ve had a bath mat crisis or two, you’ll understand why I’m now the person who gives bath mats as housewarming gifts—complete with care instructions and non-slip gripper pads. Your bathroom floor might be the last place you expected to require this much thought, but getting it right makes a real difference in daily life.
Take a moment today to evaluate your current bath mat situation. Does it slip? Smell? Look dingy? Is it actually safe for everyone in your household? If the answer to any of these is yes, you now have the knowledge to fix it. Your feet—and anyone else using your bathroom—will thank you.
Leave a Reply