
I’ll be honest—I never thought much about bath mats until I noticed those stubborn dark marks on my bathroom floor. After years of stepping out of the shower onto various mats, dealing with curled edges, mysterious residue, and that distinctive smell of deteriorating rubber, I’ve learned more about bath mat care than I ever expected. This guide shares everything I’ve discovered through trial, error, and plenty of scrubbing.
Understanding Bath Mat Damage: What You Need to Know
Does Bath Mat Damage Tub/Floor?
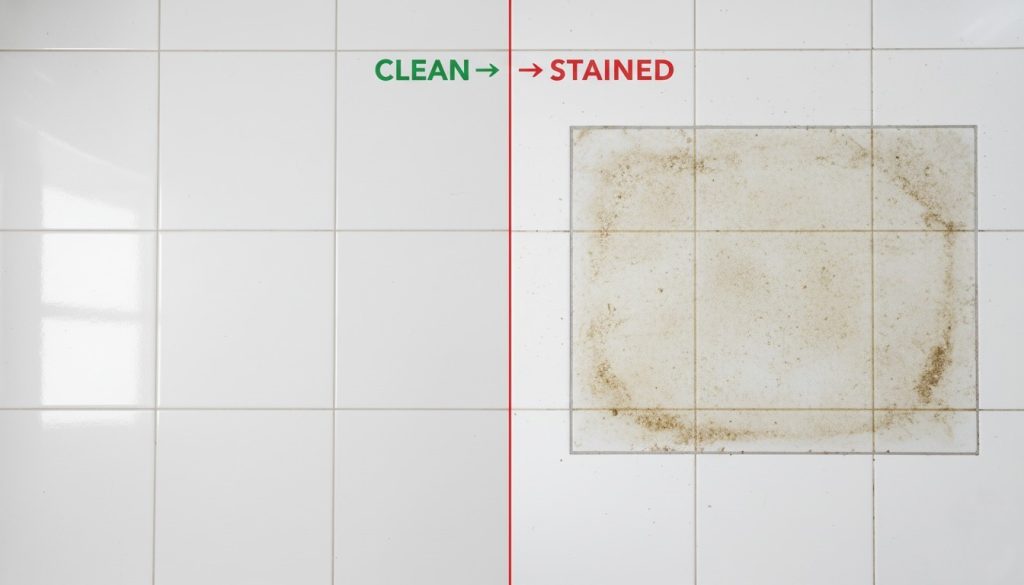
Here’s something I wish I’d known earlier: yes, bath mats can absolutely damage your bathroom surfaces. I discovered this the hard way when I moved my mat after six months and found yellowish-brown staining on my pristine white tiles. The problem isn’t the mat itself—it’s what happens when we leave them in place without proper care.
The damage typically shows up in three ways. First, there’s discoloration. The rubber backing on most bath mats contains chemicals that can leach out when exposed to constant moisture and heat. On my ceramic tiles, this created a shadow outline of the mat that took serious elbow grease to remove. Second, moisture gets trapped underneath, especially if your bathroom doesn’t ventilate well. This creates the perfect environment for mildew, which can stain and even etch certain surfaces over time. Third—and this surprised me—some mat materials can react with the finish on acrylic tubs, causing dull spots or cloudiness.
Different surfaces face different risks. Porcelain and ceramic can handle bath mats reasonably well, but you’ll still see staining if you’re not careful. Acrylic tubs are more vulnerable to chemical reactions from the rubber backing. Natural stone tiles? Don’t even think about leaving a rubber-backed mat sitting on travertine or marble—the combination of moisture and chemicals can permanently etch the surface. And if you have vinyl or laminate flooring near your tub, the weight and moisture can cause indentations and warping.
The best prevention I’ve found is simple: hang your bath mat to dry after every shower. I know it sounds tedious, but those thirty seconds save hours of cleaning later. I drape mine over the tub edge or a towel bar. Also, give the floor underneath a quick wipe-down at least twice a week. It makes all the difference.
Common Bath Mat Issues & Quick Fixes
How to Fix Warped/Torn Bath Mats
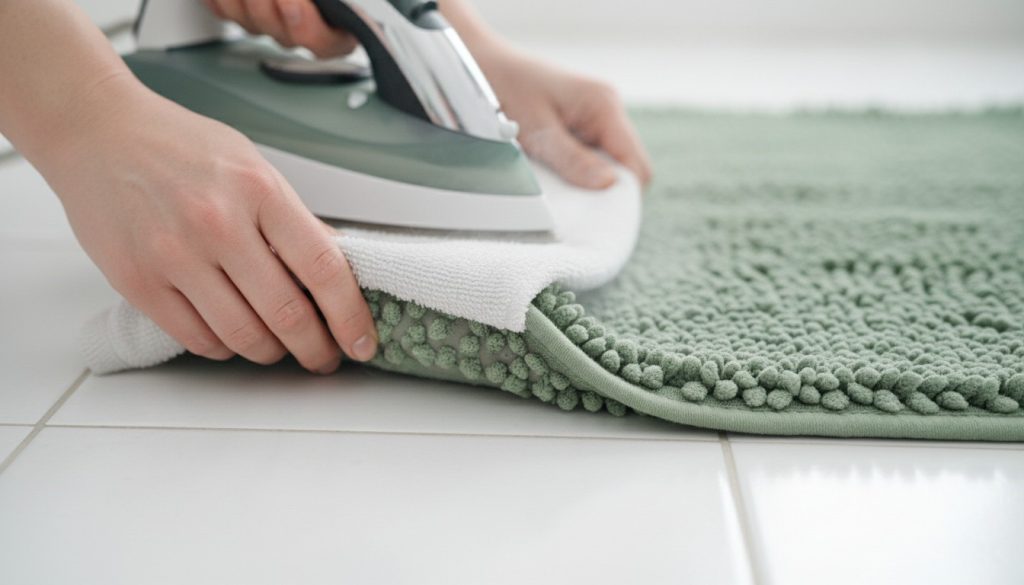
My favorite microfiber mat started curling at the edges after about four months. The corners would flip up, creating a tripping hazard every time I stepped out of the shower. Warping happens because the rubber backing doesn’t dry evenly—it contracts in some areas and expands in others, pulling the mat out of shape.
For minor warping, I’ve had great success with the heat method. Lay the mat flat on a clean surface, place a damp towel over the warped area, and press it with a warm iron (not hot—you don’t want to melt anything). Move the iron slowly, checking frequently. The heat softens the rubber just enough to relax those contracted areas. I’ve salvaged three mats this way, and they stayed flat for months afterward.
Tears are trickier but not impossible. Small tears in the fabric top can be patched with fabric glue or iron-on patches from any craft store. I patched a small tear in my memory foam mat using a scrap piece from an old towel and waterproof fabric adhesive. It’s held up through dozens of washes. For tears in the rubber backing, you need flexibility—regular glue cracks. I use Shoe Goo or similar flexible adhesives. Apply it to both sides of the tear, press them together, weigh it down, and let it cure for 24 hours.
That said, some damage isn’t worth fixing. If more than 30% of the rubber backing has deteriorated into a crumbly mess, or if the mat has multiple large tears, it’s time to replace it. I learned this after spending an hour trying to fix a mat that fell apart the next week anyway.
How to Remove Bath Mat Residue/Adhesive
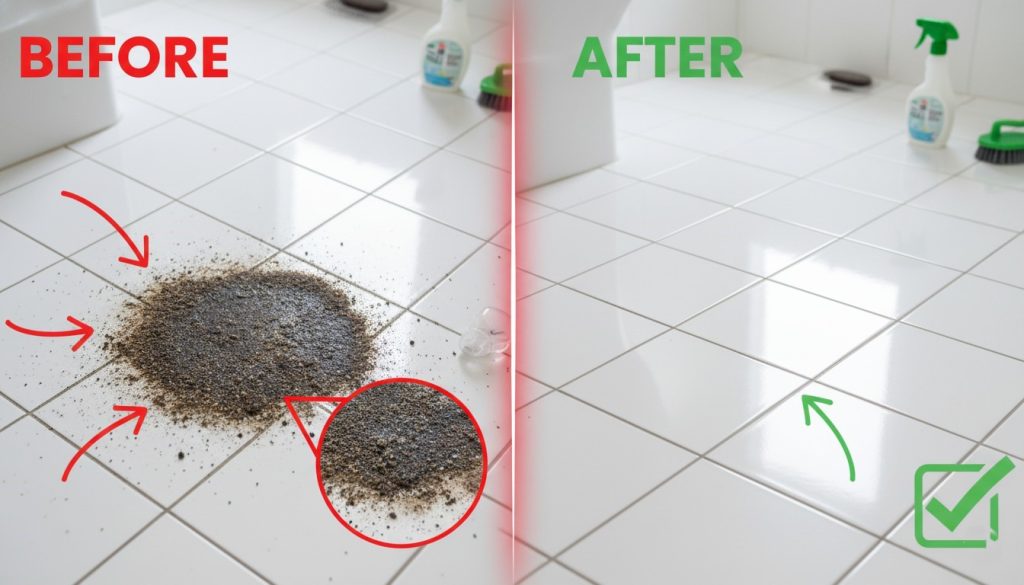
This is probably the most frustrating bath mat problem I’ve dealt with. That sticky, grimy residue seems to bond permanently with your floor, especially if the mat has been sitting there for months. The marks from suction cups are particularly stubborn—little dark circles that mock your cleaning efforts.
I’ve tried every solution under the sun, and here’s what actually works. Start with the gentlest approach: warm water and dish soap with a soft scrub brush. This handles fresh residue and light buildup. If that doesn’t work—and in my experience, it usually doesn’t for older residue—move to white vinegar. Soak paper towels in undiluted vinegar, lay them over the residue, and let them sit for 15-20 minutes. The acid breaks down the rubber compounds. Then scrub with a non-abrasive sponge.
For truly stubborn adhesive, baking soda paste is my secret weapon. Mix baking soda with just enough water to form a thick paste, spread it over the residue, and let it sit for 30 minutes. The mild abrasiveness, combined with the alkaline properties, works magic. I once removed six-month-old suction cup marks using this method after everything else failed.
Commercial adhesive removers like Goo Gone work too, but test them in an inconspicuous spot first. I damaged the finish on my rental apartment’s linoleum by going straight for the harsh stuff without testing. Now I always start gently and work my way up.
The real lesson? Don’t let it get to that point. I now move and hang my mat after every use, and I haven’t seen residue buildup since.
Deep Restoration Techniques
How to Restore Old Bath Mats
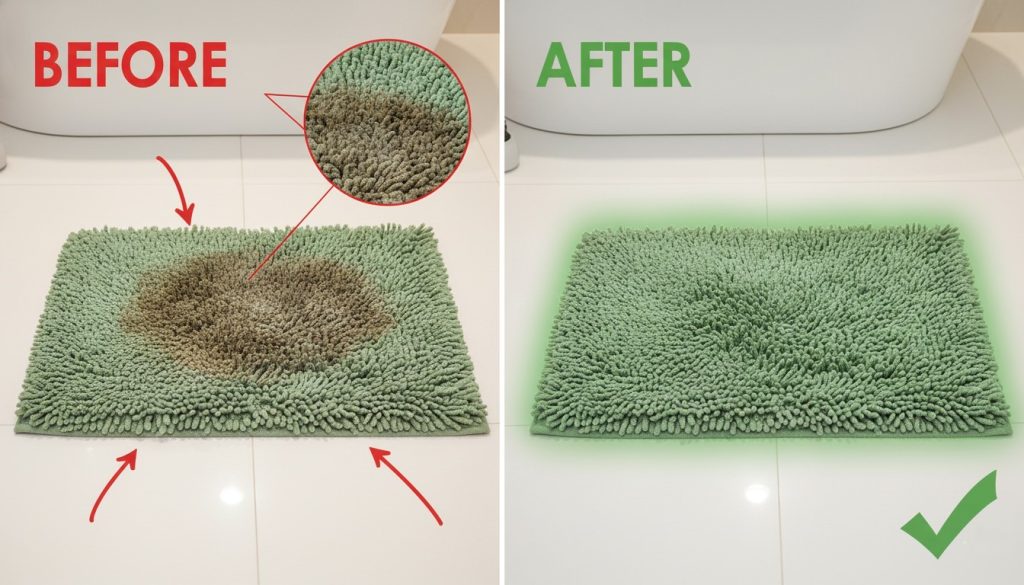
I’m the type who hates throwing things away if they can be saved, so I’ve become pretty good at breathing new life into tired bath mats. The key is knowing whether restoration is worth the effort. If the mat still has intact backing, decent structural integrity, and the stains are superficial, you can probably restore it.
My go-to restoration process starts with a thorough assessment. I flip the mat over and check the rubber backing—if it’s cracking extensively or crumbling when touched, restoration won’t help much. But if the backing is mostly intact with just some discoloration or slight stiffness, we’re in business.
For machine-washable mats, I do a hot water wash with a cup of white vinegar and regular detergent. The vinegar cuts through soap residue and mineral buildup that makes mats feel stiff and look dingy. I learned to skip the fabric softener—it actually reduces the mat’s absorbency and can break down rubber faster. After washing, I air-dry completely. Never put rubber-backed mats in the dryer unless you want a shrunken, warped disaster. I made that mistake once with a brand-new mat and ended up with something resembling a Salvador Dalí painting.
For mats that can’t be machine-washed, hand washing works surprisingly well. I fill my tub with hot water, add a generous squirt of dish soap and half a cup of baking soda, and let the mat soak for 30 minutes. Then I scrub both sides with a soft brush—I use an old dish brush dedicated to this purpose. The baking soda acts as a gentle abrasive that lifts embedded dirt without damaging fibers.
Stubborn stains need targeted treatment. For mildew stains, I make a solution of one part bleach to four parts water (only for white or colorfast mats—test first!) and apply it with a spray bottle. Let it sit for 10 minutes, then rinse thoroughly. For soap scum buildup that makes the surface feel slick, undiluted white vinegar works better than anything else I’ve tried.
I restored a five-year-old memory foam mat using these techniques, and it looked almost new. The colors brightened, the texture softened, and that musty smell completely disappeared. It’s still in use two years later.
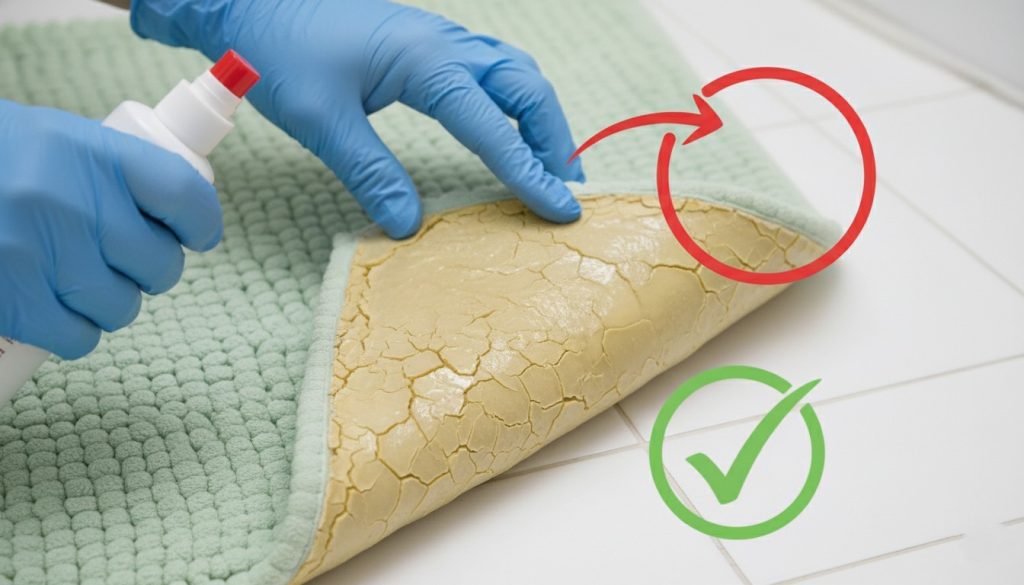
How to Restore Rubber Backing
The rubber backing is usually the first thing to go on a bath mat, and honestly, it’s the hardest to restore. That backing degrades because of constant exposure to water, soap residue, body oils, and heat from your bathroom. Over time, it becomes dry, cracks appear, and eventually it starts crumbling or leaving black marks everywhere.
If the cracking is minimal—just surface-level dryness without chunks coming off—you can sometimes extend the mat’s life with conditioning. I’ve used silicone-based treatments meant for rubber car trim, applied sparingly to the backing with a cloth. The silicone penetrates the surface and adds some flexibility back. It won’t reverse severe damage, but I’ve added months to a mat’s lifespan this way. Just make sure whatever product you use is non-toxic, since you’re walking on barefoot.
For backing that’s more deteriorated, you can try a DIY rubber coating refresh. I experimented with Plasti Dip spray—the stuff people use on tool handles—on a mat I was ready to throw away anyway. I laid the mat face down outside, cleaned the backing thoroughly, and applied thin, even coats according to the product instructions. It took about four coats to build up a decent layer. The result wasn’t perfect, but it gave me another six months of use.
When the backing is truly beyond saving but the mat surface is still great, I’ve had success adding new grip. Non-slip rug pads work reasonably well underneath mats that have lost their grip. You can also buy roll-on rug backing from craft stores—basically, liquid rubber you paint onto the underside. I did this with my favorite chenille mat after the original backing disintegrated. The application was messy and required good ventilation, but the mat has been working perfectly for over a year now.
The hard truth is that severely degraded rubber backing can’t really be “restored” to original condition. These techniques are more about extending usability and making the mat safer. When the backing starts leaving residue with every use or the cracks are so extensive that chunks fall off, it’s time to let go.
Long-Term Maintenance & Prevention
After dealing with all these issues, I’ve developed a maintenance routine that keeps my bath mats in good shape much longer. It’s not complicated, but consistency matters.
Daily care takes almost no time. After showering, I hang the mat over the tub edge or shower door. This single habit has prevented more problems than anything else—the mat dries completely, the floor underneath stays dry, and that musty smell never develops. On days when I’m rushed, I at least flip the mat over so both sides get air exposure.
Weekly, I give the floor underneath a quick wipe-down with a bathroom cleaner. This prevents any residue buildup and lets me catch potential staining early. I also shake the mat outside if weather permits—it’s amazing how much hair, dust, and debris accumulate.
Every two to three weeks, my mats go through a wash cycle. This might seem excessive, but it prevents the gradual buildup that leads to that dingy, stiff feeling. Between washes, they stay fresh, soft, and pleasant to step on.
I’ve also learned to recognize the warning signs that a mat needs replacing. When the rubber backing starts leaving marks on the floor with regular use, that’s the beginning of the end. If the mat develops a smell that doesn’t disappear after washing, bacteria has likely penetrated too deeply. Visible thinning of the fabric surface, extensive cracking in the backing, or loss of absorbency despite cleaning all indicate it’s time to shop for a replacement.
When buying new mats, I now prioritize quality over price. Mats with thicker rubber backing and tightly woven fabric surfaces last significantly longer. I avoid ultra-cheap mats with thin backing—they might cost half as much, but they need replacing three times as often. Memory foam mats with microfiber tops have become my favorite; they’re absorbent, comfortable, and the backing tends to hold up better than basic rubber.
Storage matters too. When I had a second bathroom mat that wasn’t in daily use, storing it rolled up in a linen closet caused permanent creases and backing damage. Now I store extra mats flat or hanging, never folded or rolled for extended periods.
Conclusion
Bath mats seem like such simple things until they start causing problems. I’ve spent more time than I’d like to admit scrubbing residue, flattening warped edges, and trying to salvage mats that should’ve been replaced months earlier. But I’ve also learned that with proper care, a good bath mat can last years instead of months.
The real secret isn’t complicated—hang it to dry, clean it regularly, and address small issues before they become big ones. Those dark stains on your floor, that musty smell, the curling corners—they’re all preventable with just a few minutes of attention each week.
Take a look at your bath mat right now. Flip it over and check the backing. Is there residue underneath? Are the edges starting to curl? A little maintenance today saves a lot of frustration later. Trust me, your feet—and your bathroom floor—will thank you.
Leave a Reply